Category: Core Skills

  • How To Play Fm On Piano

    How To Play Fm On Piano

    The F minor piano chord is a beautiful, darker-sounding triad commonly found in many popular songs and classical pieces.

    Mastering the F minor chord will broaden your repertoire of chords, deepen your understanding of music theory and harmony, and introduce you to new and exciting sounds.

    If you’re new to the world of piano, then learning about the Fm piano chord can seem daunting. Understanding hand and finger positioning for the chord can also be challenging.

    But don’t worry, as I’m here to help!

    In this article, I’ll explain how Fm (F minor) chord is built and how to play the Fm chord on a piano. I’ll break down all the essential details, from fingerings to inversions, to help you play this basic piano chord with confidence and control.

    So, let’s get started!

    What is an Fm Chord?

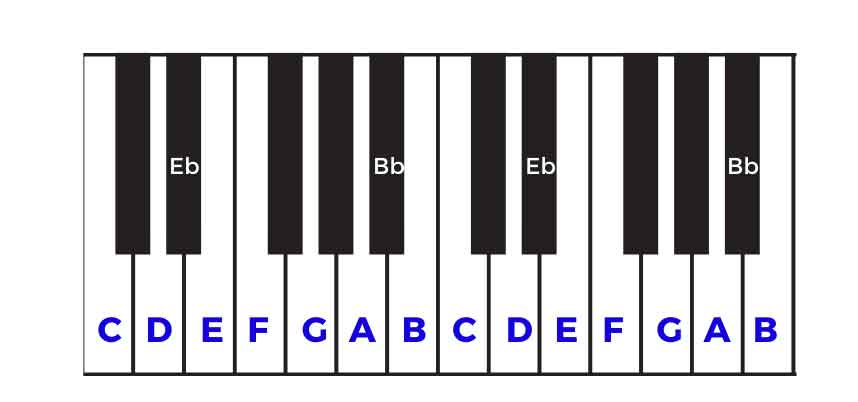
    An Fm is a piano chord that consists of three notes: F, A♭, and C. The F is the root note, A♭ is the minor third, and C is the perfect fifth. This piano chord is also written as F minor, Fmin, or F – (F followed by a minus sign). “F-” is less commonly used.

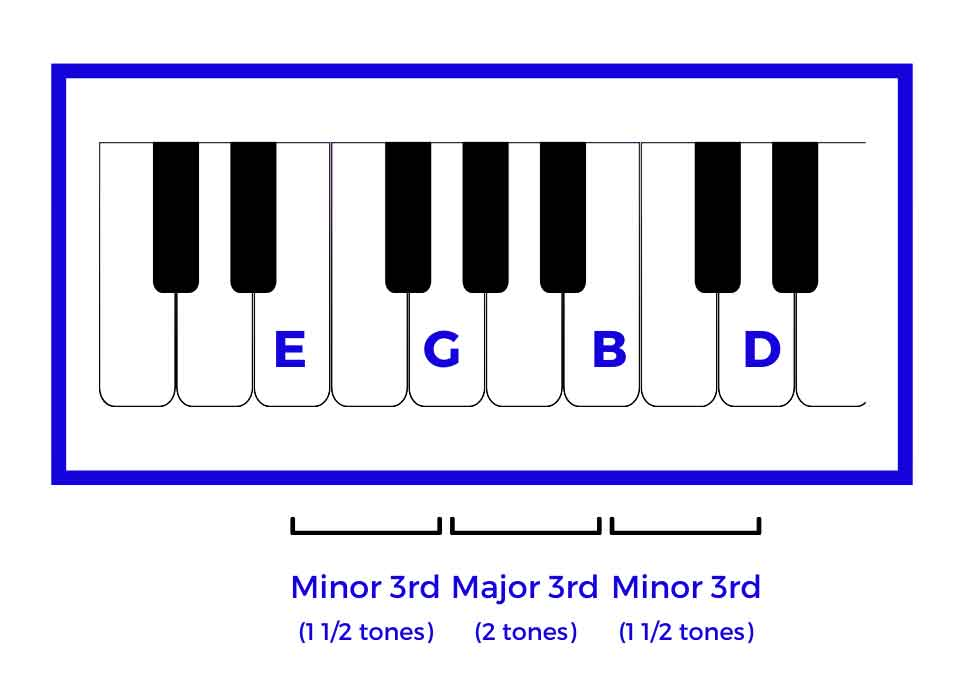
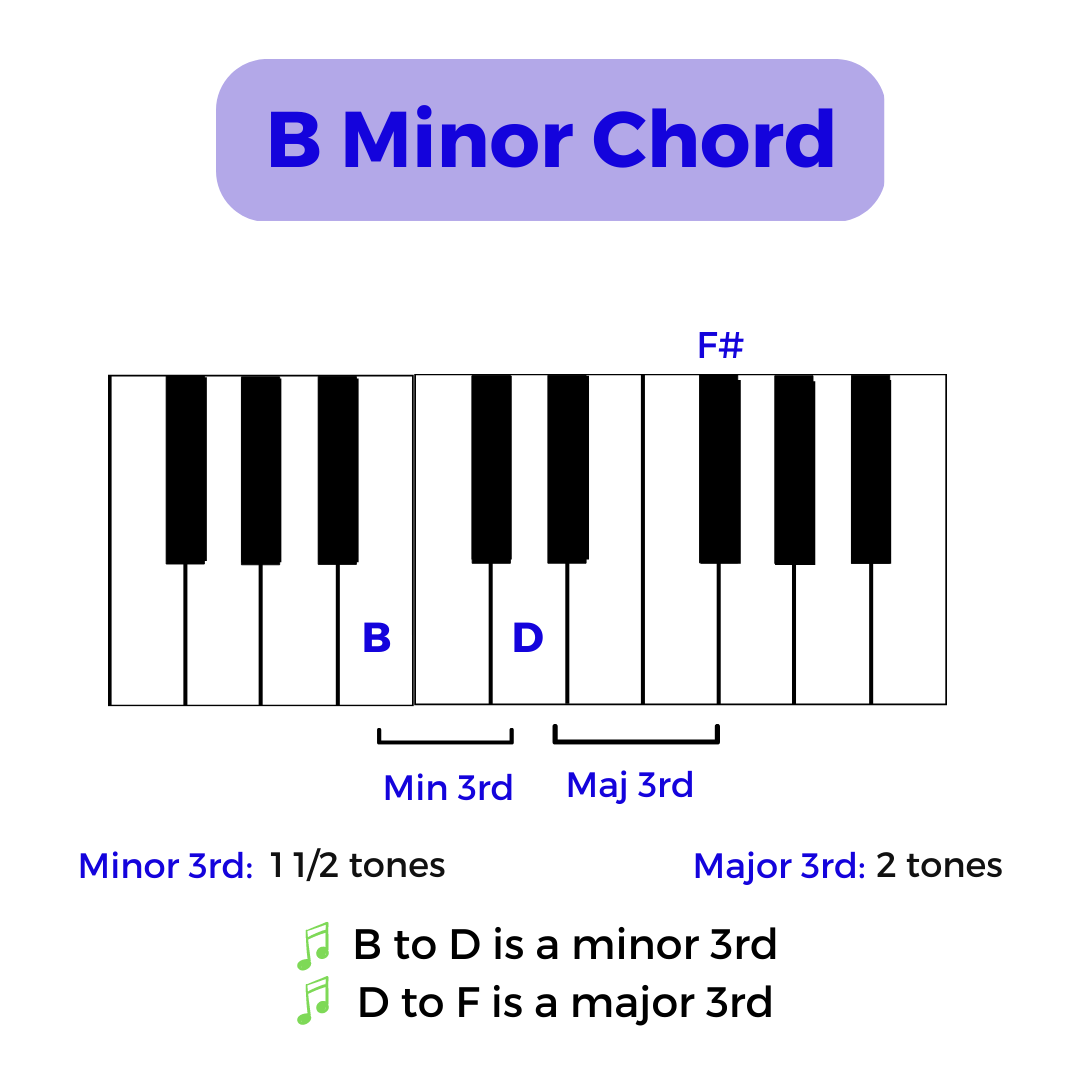
    The Fm chord is a minor triad, meaning it follows the intervallic formula of a minor third followed by a major third.

    In other words, the distance between the root note (F) and the minor third (A♭) is three half steps or semitones, and the distance between the minor third and the perfect fifth (C) is four half steps or semitones.

    Note: All minor chords (triads) follows the same intervallic formula of a minor third (three half steps) followed by a major third (four half steps).

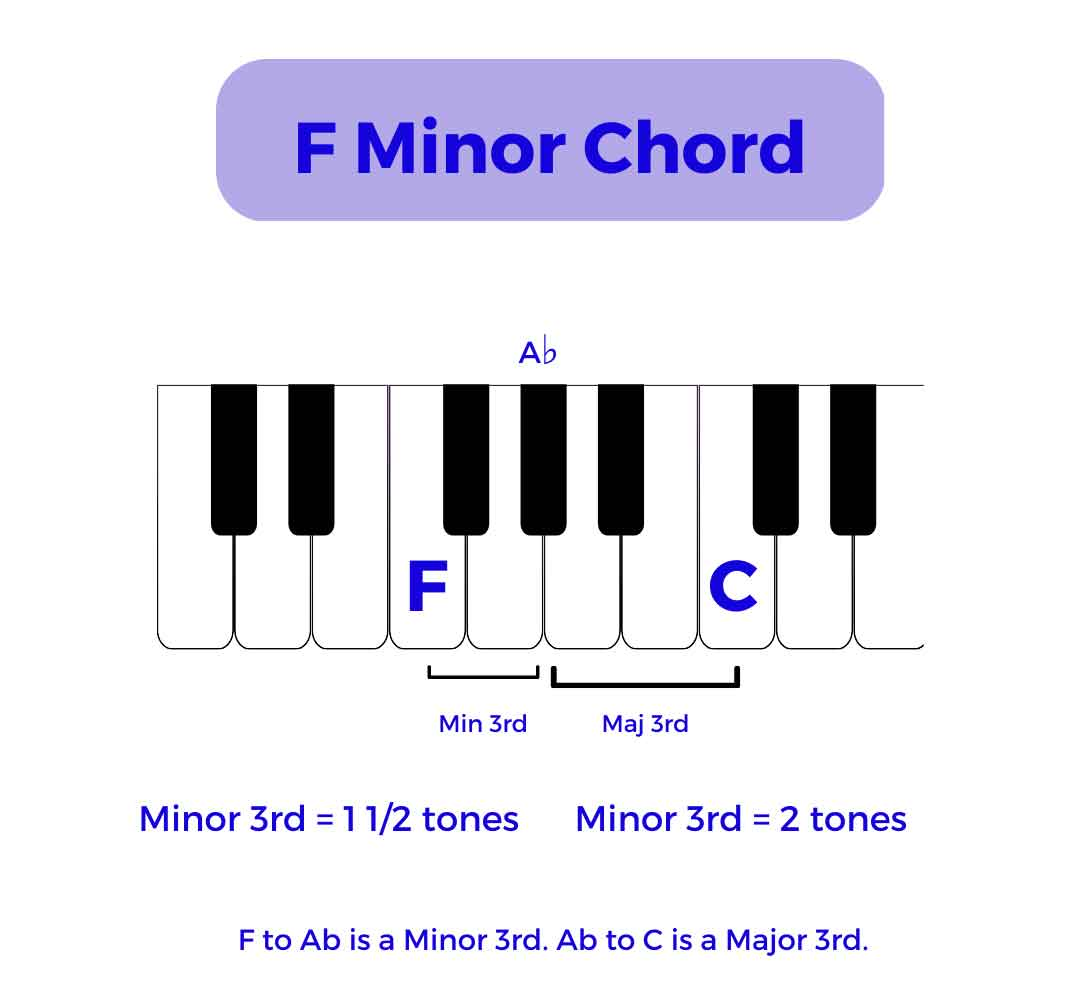
    A minor third interval is F to Ab, while a major third interval is Ab to C. In music, the minor third interval is three-half steps higher than a given note, while the major third interval is four-half steps higher than the note.

    In terms of the scale degree formula, the Fm chord follows the pattern 1 – ♭3 – 5. The Fm triad is written as follows:

    F – A♭ – C

    That means the root note (F) is the first degree of the scale, the minor third (A♭) is the flat third degree of the scale, and the perfect fifth (C) is the fifth degree of the scale.

    How to play Fm on the piano

    You now know what the F minor piano chord is. In this section, I’ll explain how to play F minor chord on a piano with the right hand and left hand.

    But before we learn how this minor chord is played, let’s quickly understand the Fm piano chord finger positions!

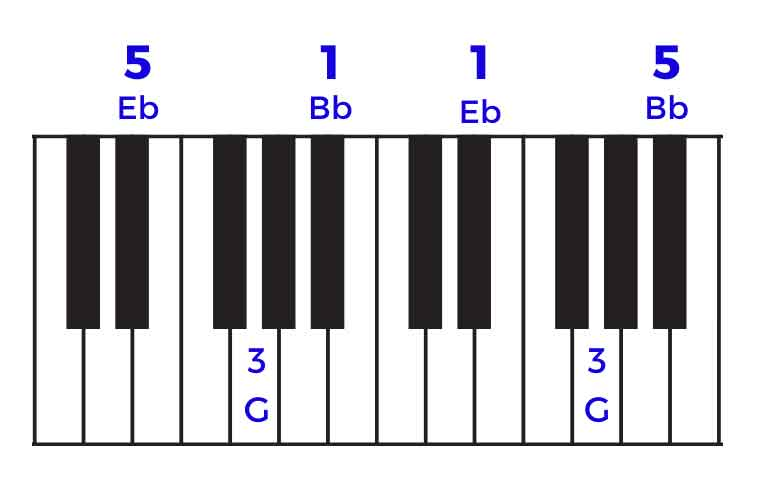
    Fm Piano Chord Finger Positions

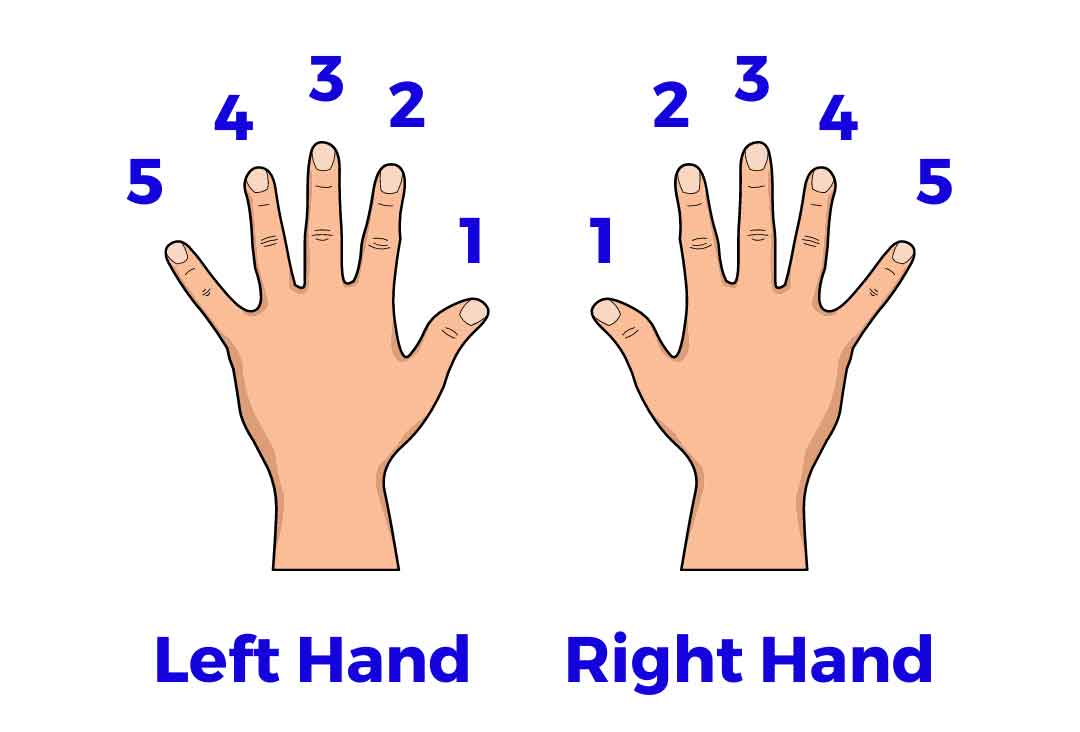
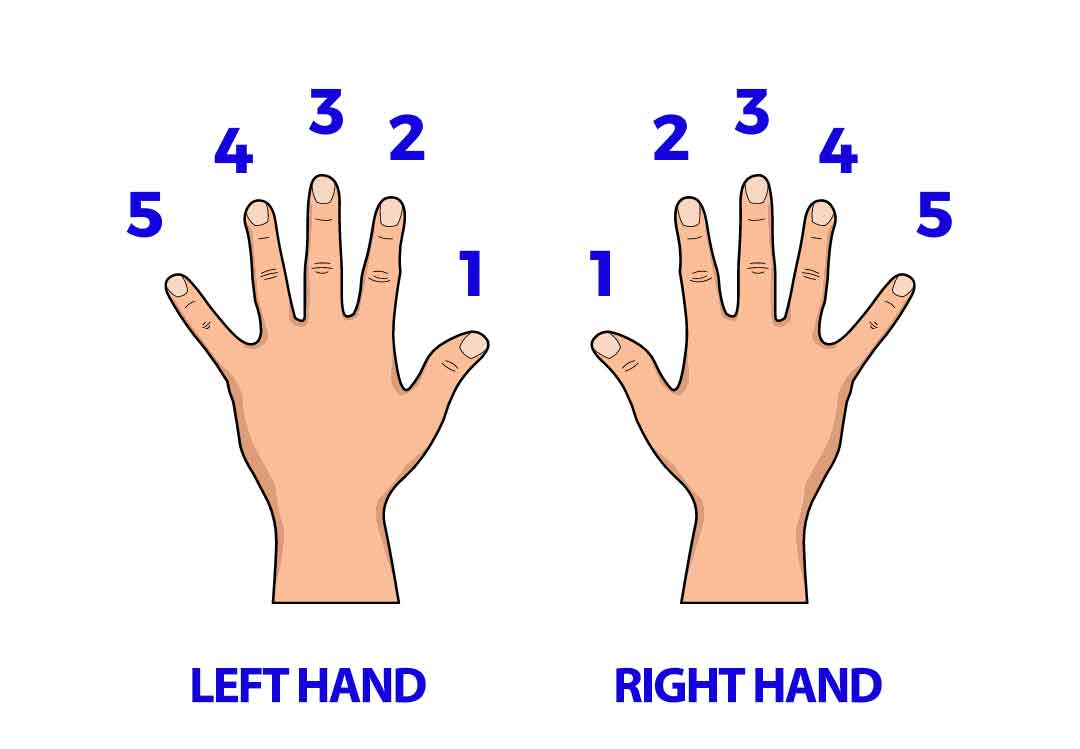
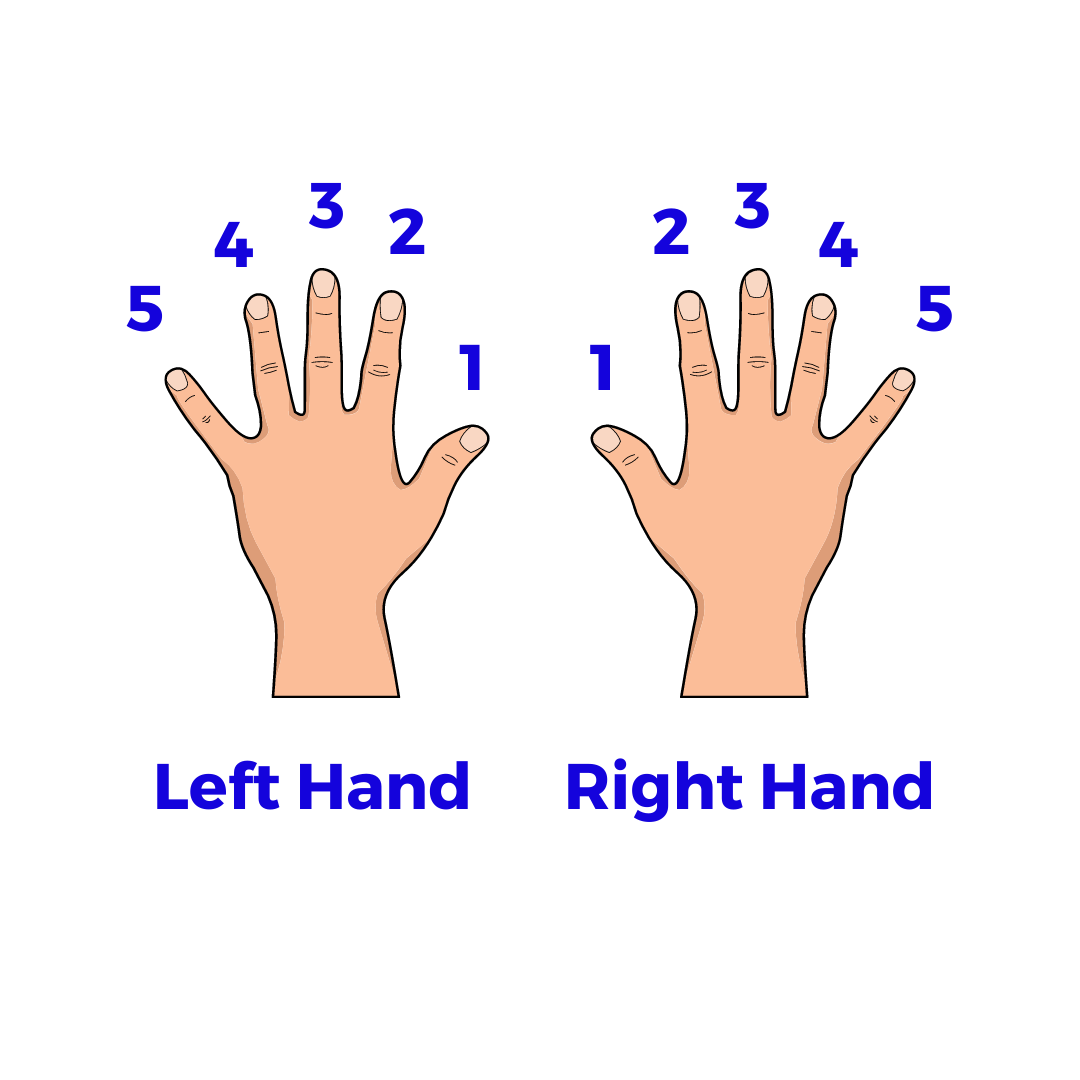
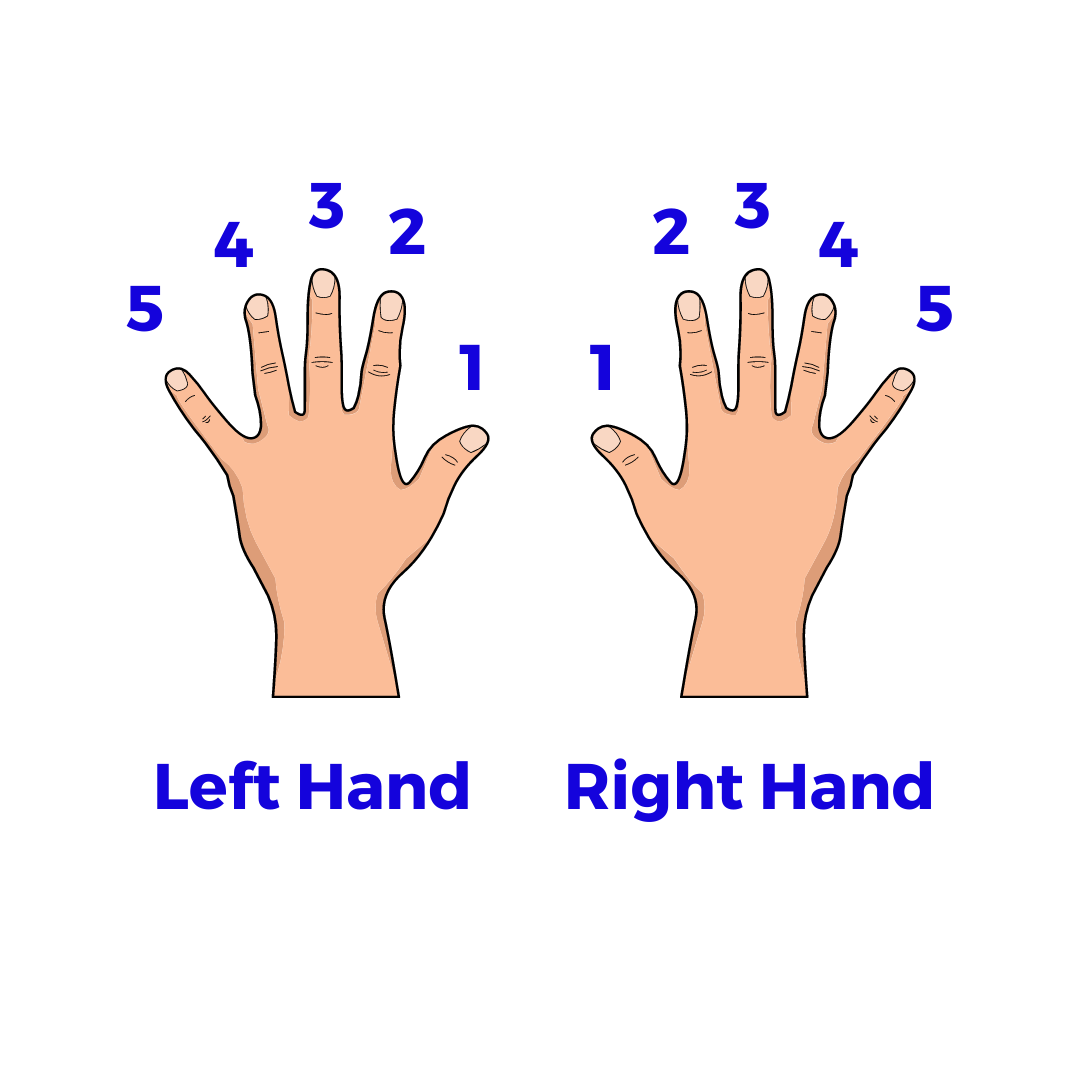
    For starters, the fingers on each hand are numbered from 1 to 5.

    The thumb is number 1, the index finger is 2, the middle finger is 3, the ring finger is 4, and the pinky finger (little finger) is 5. Remember these numbers as you position your fingers to play the chord.

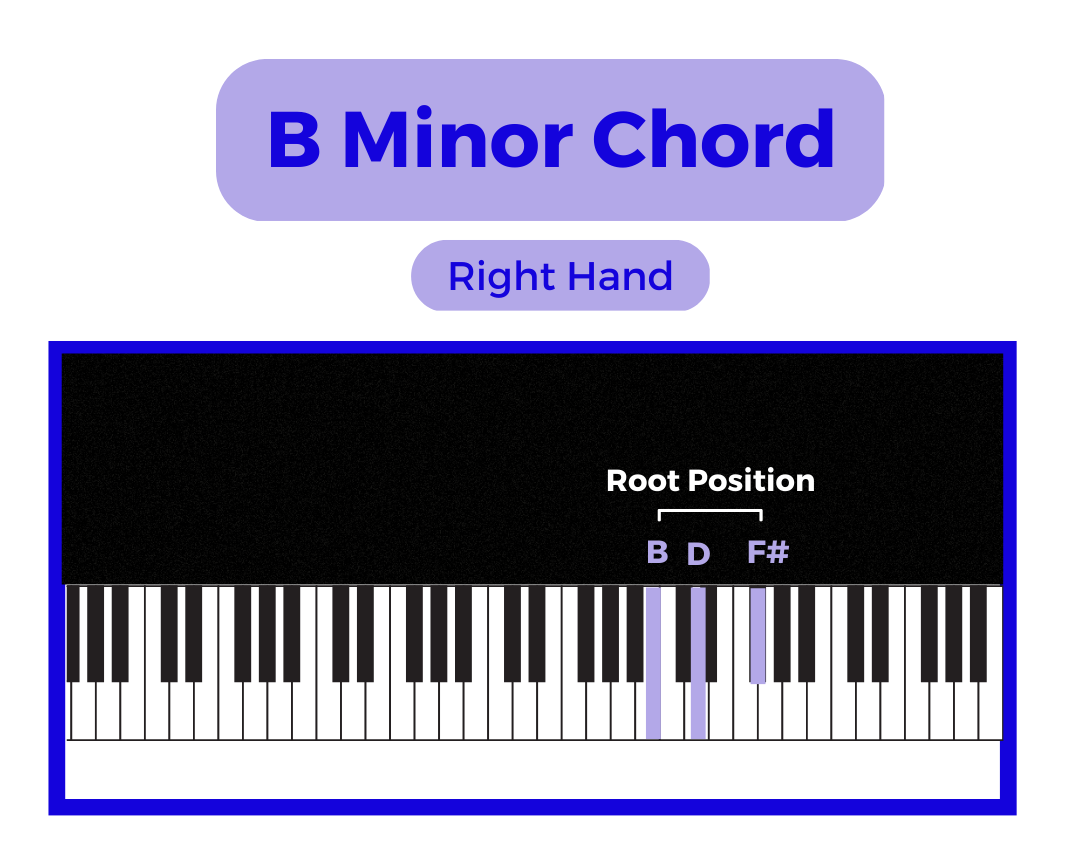
    In the root position of the F minor chord, the right-hand finger position is 1 – 3 – 5. The thumb (finger 1) plays the F note, the middle finger (finger 3) plays the Ab note, and the little finger (finger 5) plays the C note.

    In the first inversion, the finger positions of the F minor chord are 1 – 2 – 5. That means the thumb plays Ab, the index finger (finger 2) plays C, and the pinky finger plays F.

    In the second inversion, the fingering of the Fm piano chord is 1 – 3 – 5. That means your thumb plays C, the middle finger plays F, and the pinky finger plays Ab.

    Playing the Fm Chord with the Right Hand

    To play the Fm chord in the root position with your right hand, use the following fingers:

    • F – First finger (1)
    • A♭ – Third finger (3)
    • C – Fifth finger (5)

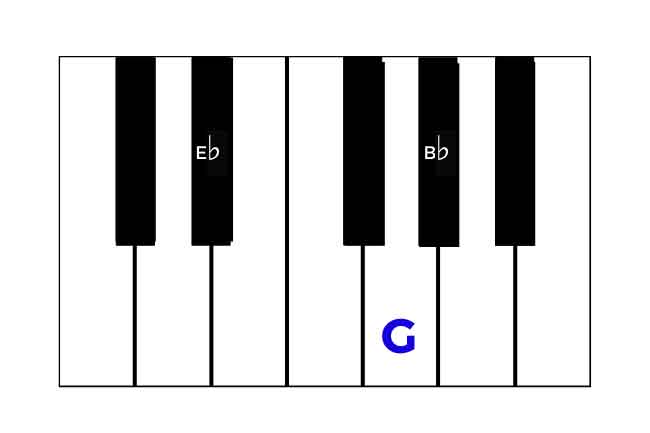
    To play the F minor chord with the right hand, place your thumb on F, the middle finger on Ab, and the pinky finger on C. At this point, the Fm chord is at its root position.

    For the correct finger placements to play an F minor chord with the right hand, see the image below:

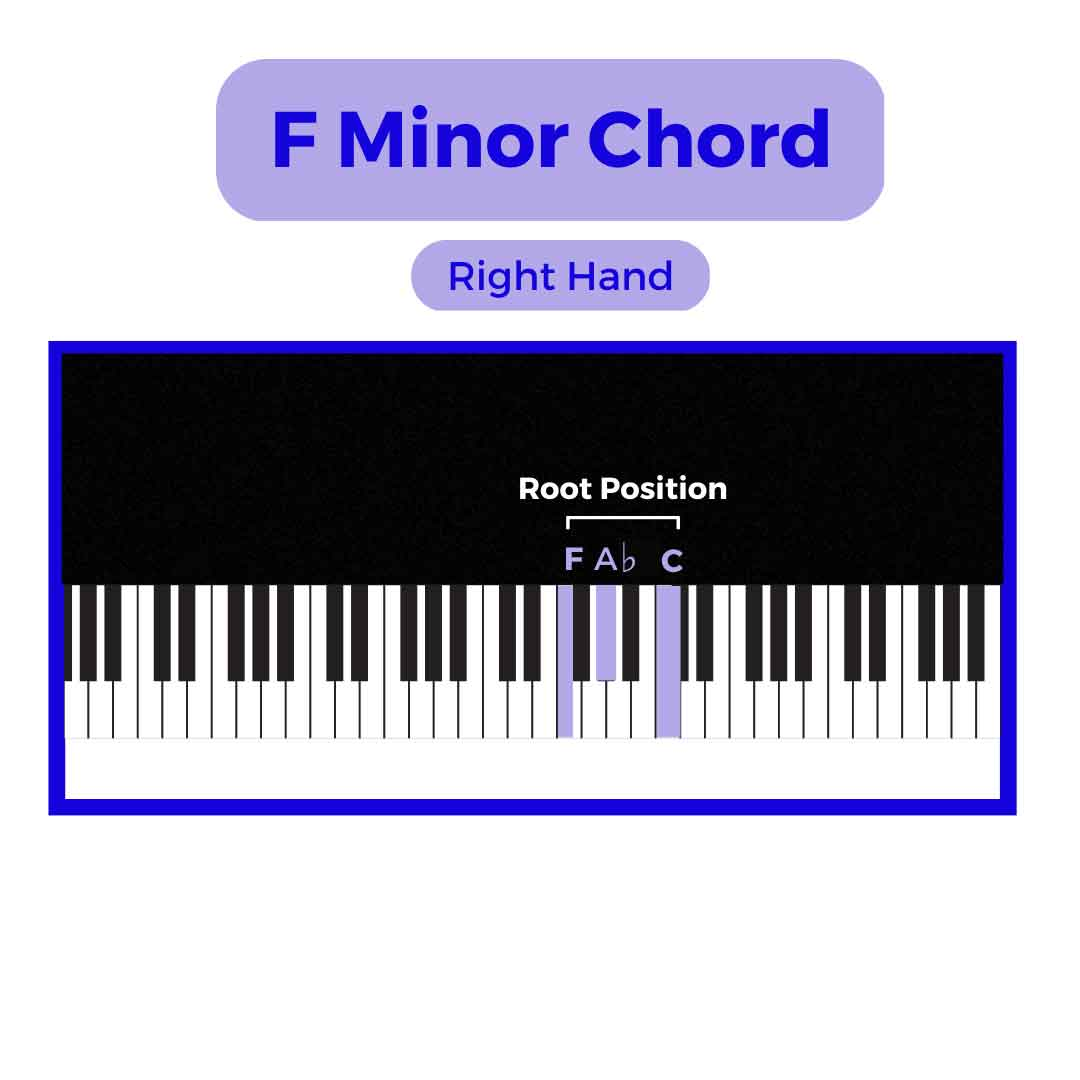
    You’ll hear the Fm piano chord when you press all three keys simultaneously.

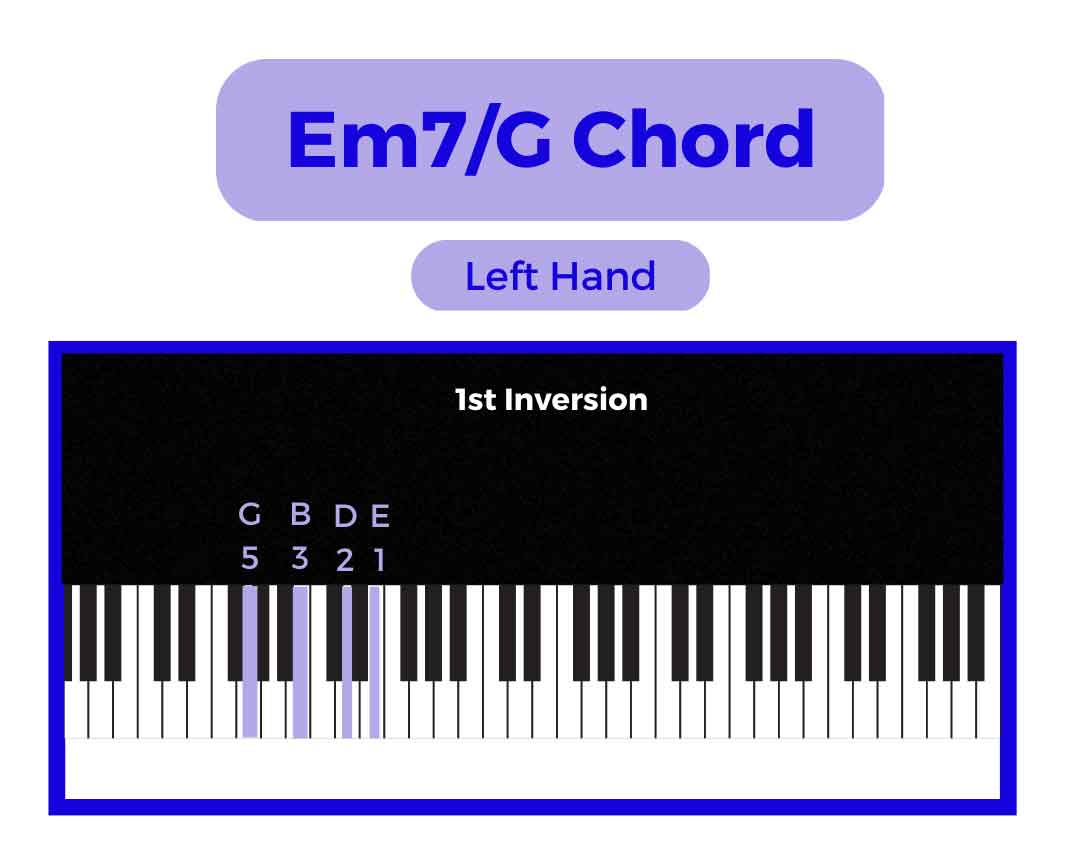
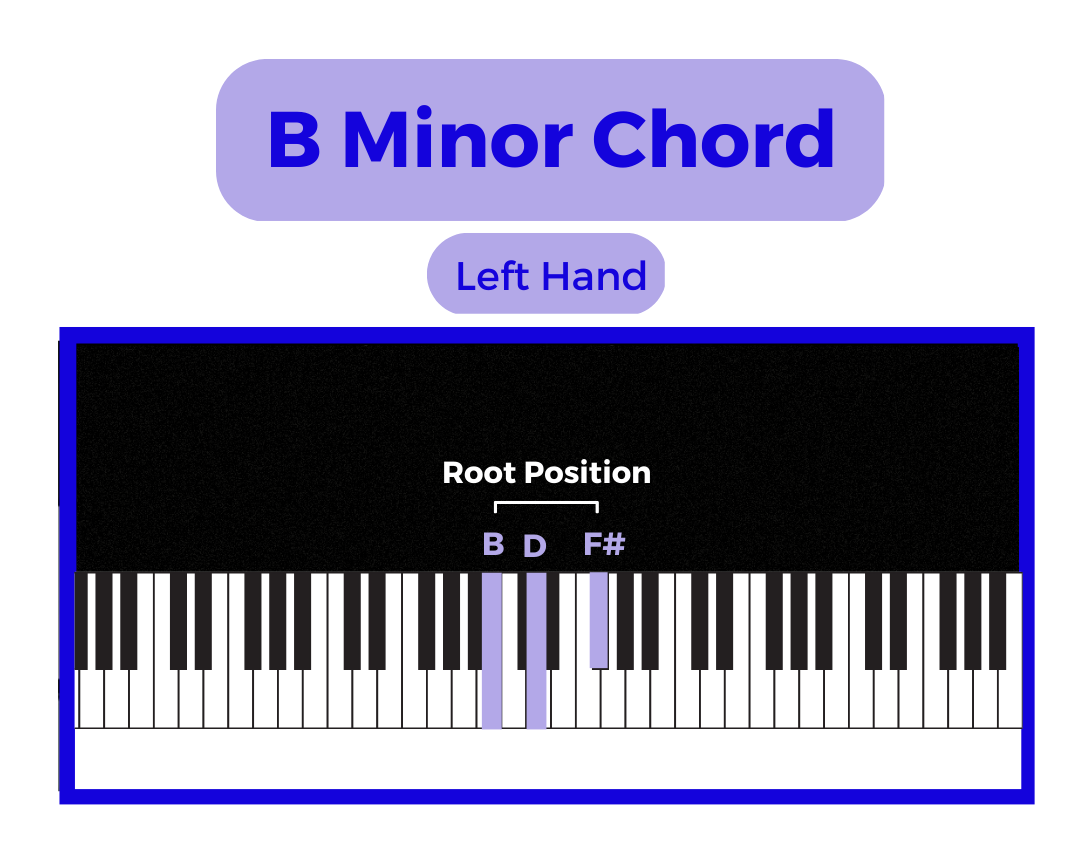
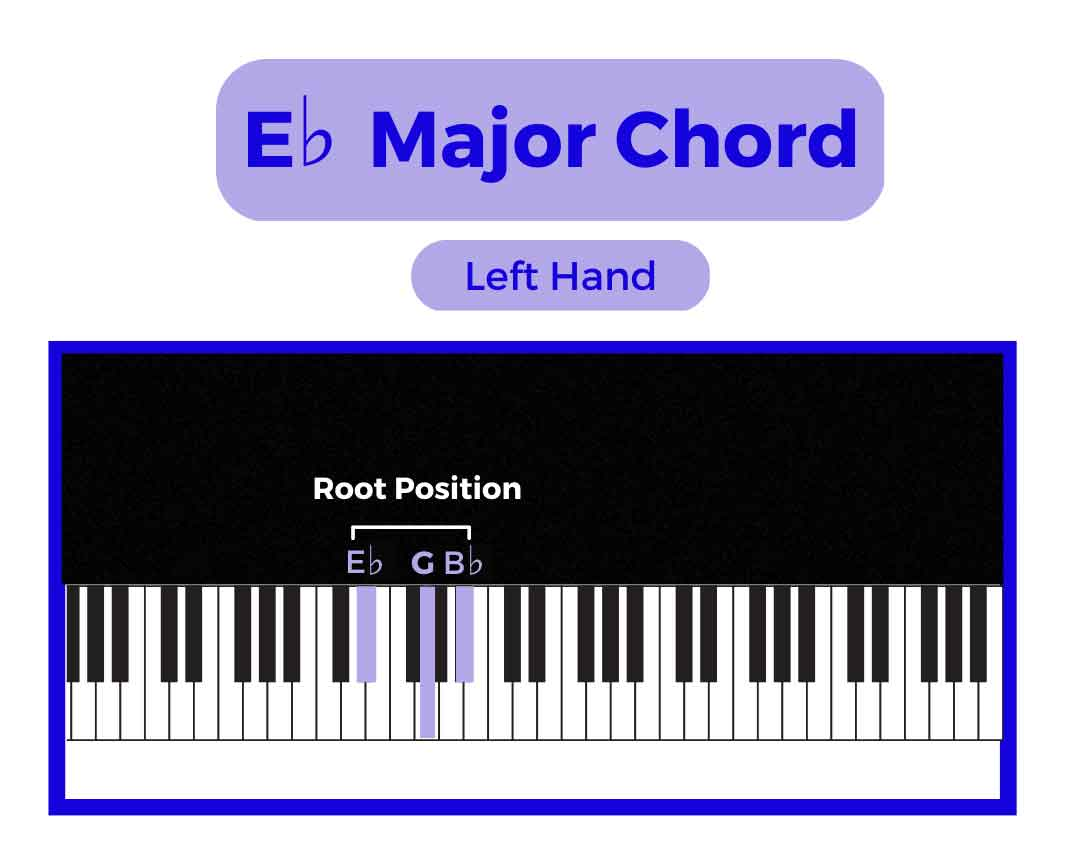
    Playing the Fm Chord with the Left Hand

    To play the Fm chord in the root position with your left hand, use the following fingers:

    • F – Fifth finger (5)
    • A♭ – Third finger (3)
    • C – First finger (1)

    Put your pinky on F (bass note), middle finger on Ab, and thumb on C to play the F minor chord with the left hand. Once you have positioned your hand correctly on your piano keyboard, press down all three keys simultaneously.

    Play this minor piano chord several times until you are comfortable with the fingering and sound.

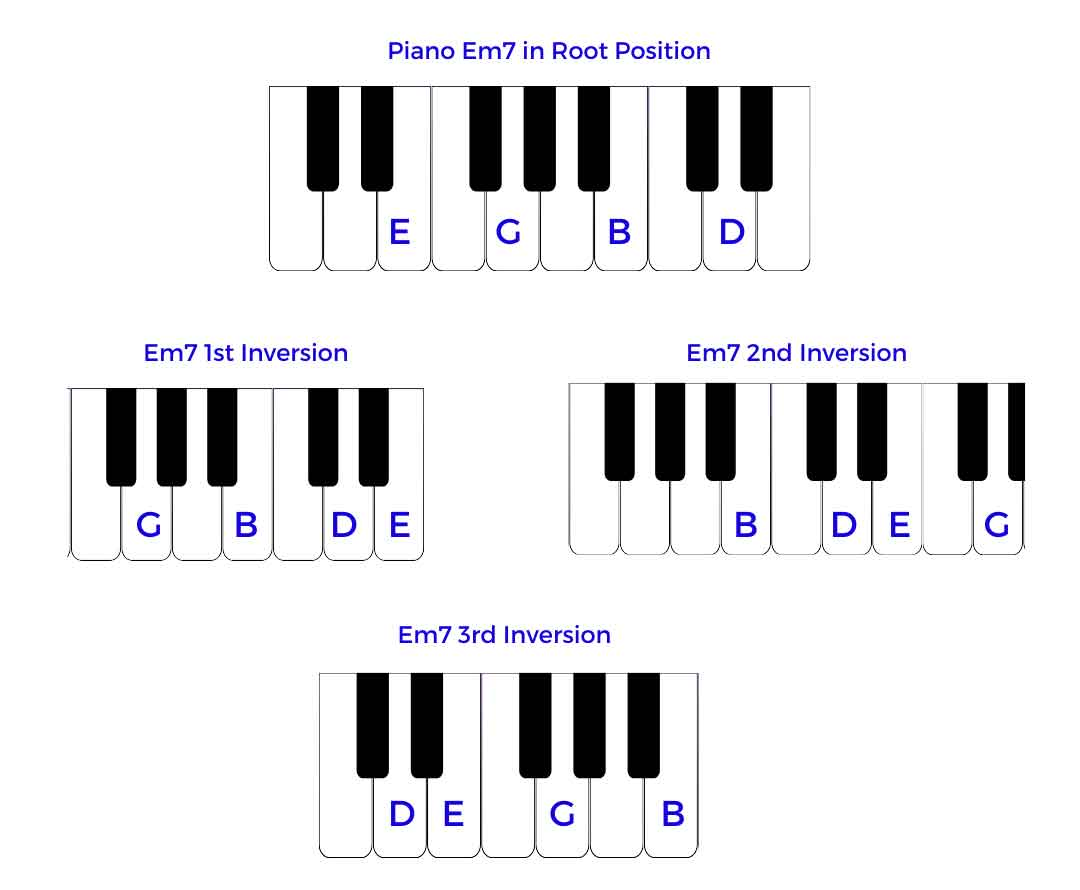
    The F minor chord has two inversions in addition to its root position. So, let’s take a look at the first and second inversions of the Fm chord.

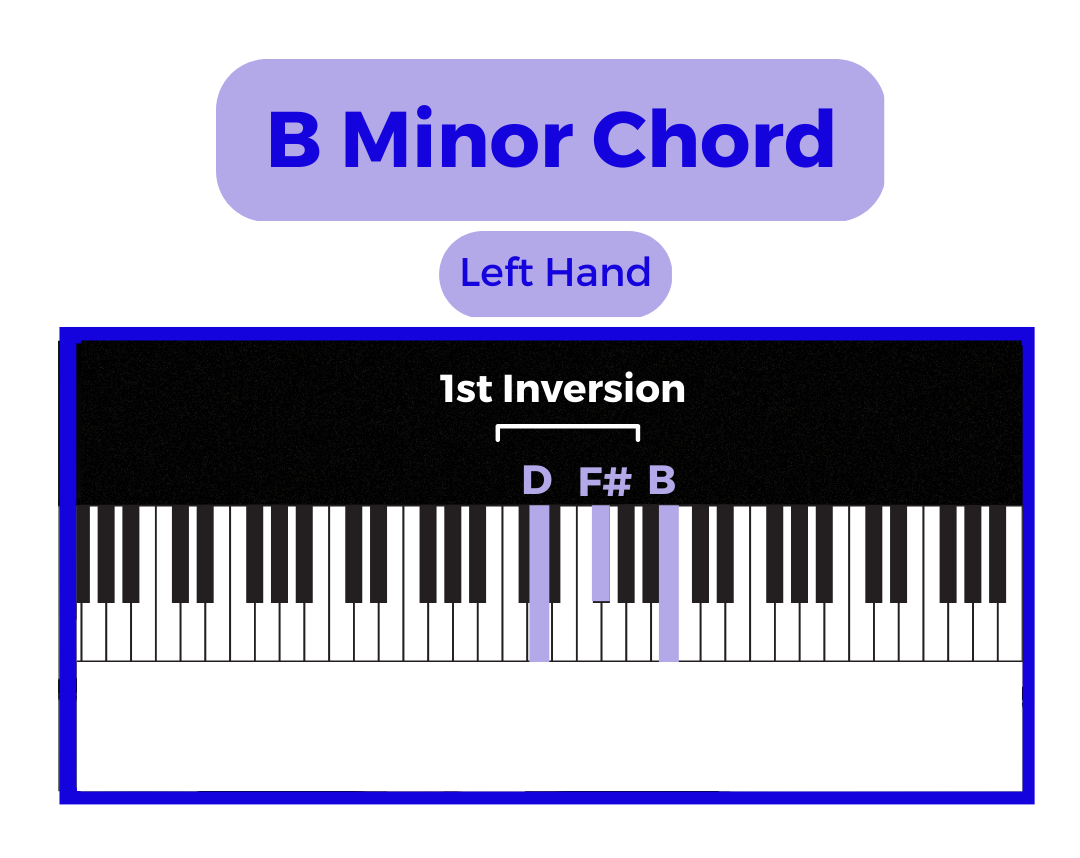
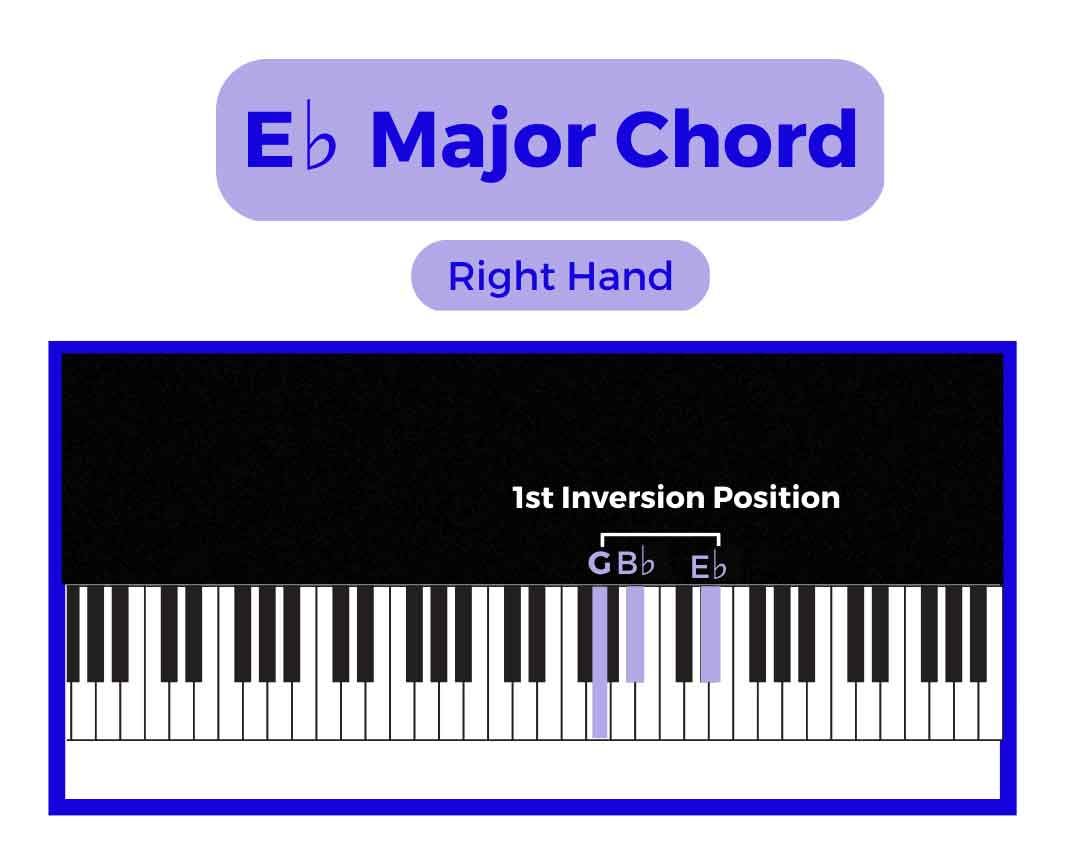
    How to Play the First Inversion of the Fm Piano Chord

    If you want to play the 1st Inversion of the Fm chord, lower the middle note (Ab). So, the Ab is the lowest note in the 1st inversion of F minor. Use the following fingers on your right hand to play the inversion:

    • A♭ – First finger (1)
    • C – Second finger (2)
    • F – Fifth finger (5)

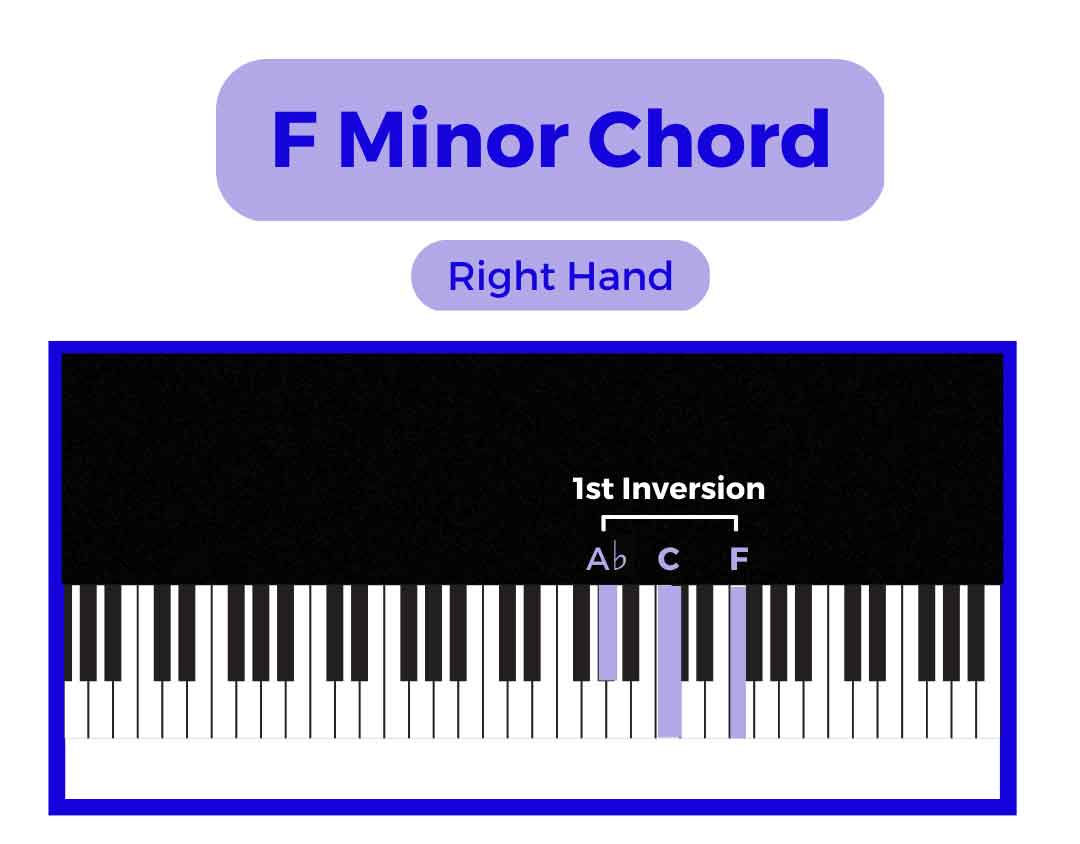
    After placing your fingers correctly, press all the notes at once to play the first inversion of the piano chord. And then practice for a few minutes to get comfortable with it.

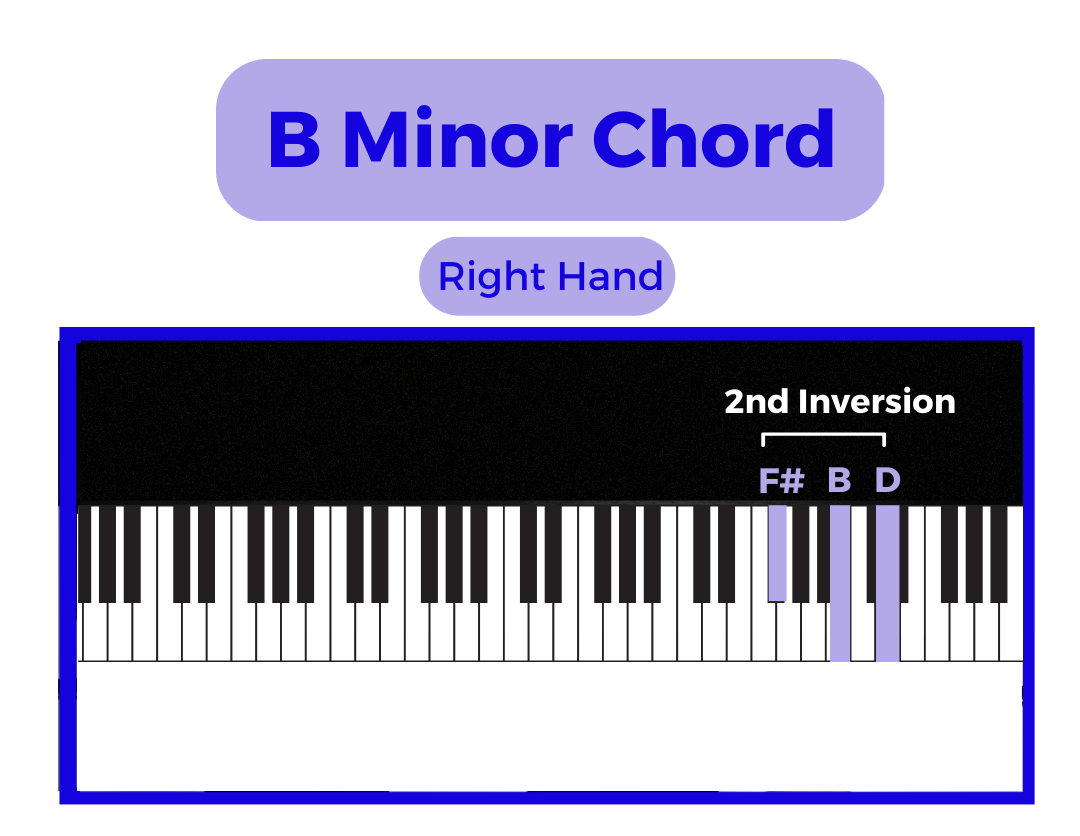
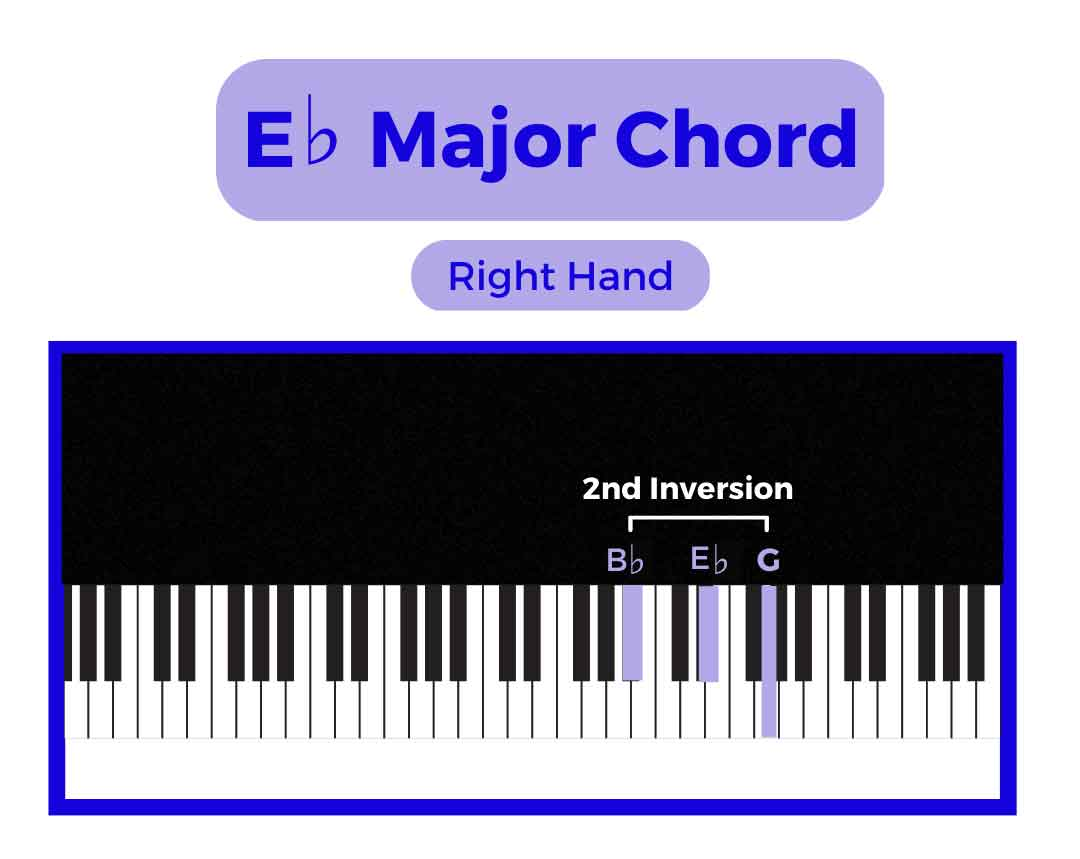
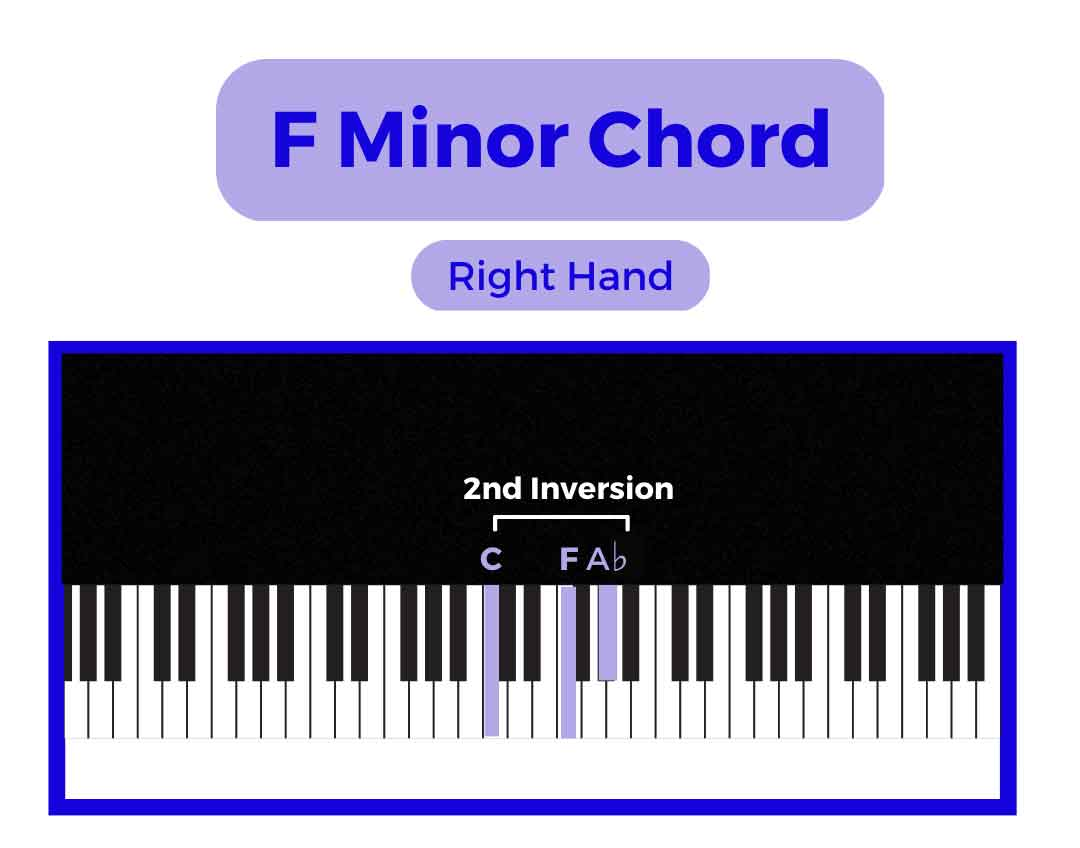
    How to Play the Second Inversion of the Fm Piano Chord

    If you want to play F minor in its 2nd inversion, put C as the bass note (lowest note). If you want to play the inversion with your right hand, use these fingers:

    • C – First finger (1)
    • F – Third finger (3)
    • A♭ – Fifth finger (5)

    Again, play these notes simultaneously and enjoy the sound of this piano chord in the second inversion.

    FAQs

    What Is The Difference Between A Minor Triad And A Major Triad?

    Minor and major piano chords differ based on the interval between the notes that make up the chord.

    A major chord (triad) consists of a root note, a major third, and a perfect fifth. The interval between the root note and the major third is four half steps or semitones, while the interval between the major third and the perfect fifth is three half steps or semitones.

    On the other hand, a minor triad consists of a root note, a minor third, and a perfect fifth. The interval between the root note and the minor third is three half steps or semitones, while the interval between the minor third and the perfect fifth is four half steps or semitones.

    In summary, a major triad and a minor triad are just the opposite of each other. A major triad is composed of a major third followed by a minor third, while a minor triad is composed of a minor third followed by a major third.

    Can I Use F Minor Chord In Different Music Styles?

    You can use the F minor chord (Fm) in various music styles. The key signature F Minor is one of the most common minor keys used in music composition.

    It works well in slower, more emotionally charged songs because the Fm chord has a sad, reflective quality. However, you can also use it to add contrast and variety to more upbeat and energetic music. You can also use it in more upbeat and energetic music to add more contrast and variety.

    The Fm chord is commonly used in flok, rock, and blues music styles. It is also popular in jazz, classical, and many other music styles.

    Are There Any Songs That Use The Fm Chord On The Piano?

    Yes, many songs use the Fm chord on the piano. Some examples include:

    • “Bohemian Rhapsody” by Green Day
    • “All of Me” by John Legend
    • “Army” by Ben Folds Five
    • “ET” by Katy Perry
    • “Michelle” by The Beatles
    • “Animals” by Martin Garrix
    • “Halo” by Beyonce
    • “First of the Year” by Skrillex

    Conclusion

    In conclusion, the Fm chord is a popular and valuable chord to know how to play on the piano. It is a minor chord consisting of the notes F, Ab, and C, and you can play it with either your right or left hand.

    You can use the Fm chord in many types of music, and it adds depth and emotion to your playing.

    Following the steps outlined in this blog post and practicing regularly, you can quickly and easily learn to play the Fm chord.

    Whether you are a beginner or an experienced musician, it is worth the time and effort to master the Fm chord.

    So, grab your best piano keyboard and practice the F minor piano chord!

    Read More

  • How To Play em7 On Piano

    How To Play em7 On Piano

    Do you want to learn How To Play Em 7 Chord On Piano? If so, you’ve come to the right place!

    The Em7 chord is a very popular chord used in many popular songs and styles of music. It is also an essential piano chord to learn for any budding pianist. Fortunately, understanding how to play the Em7 chord on piano is relatively easy.

    In this blog post, I will explain what the Em7 chord is and provide you with a step-by-step guide on how to play it on the piano.

    So let’s get started!

    What is an Em7 Chord?

    An Em7 chord is a minor seventh chord built on the E minor scale. It consists of four notes E, G, B, and D. This piano chord is called Em7, E minor 7, and E min7.

    To understand the intervals that make up an Em7 chord, let’s break it down step by step. The Em7 chord consists of three intervals: a minor third, a major third, and a minor third.

    Between the notes E and G, it’s a minor third interval made up of one and a half tones or half steps. To find this interval, start on the root of the chord (E), skip two half steps (F and F#), and land on the 3rd half step, which is the minor third of the chord (G).

    Between the notes G and B, it’s a major 3rd made up of two tones. To find this interval, start on G, skip three half steps (G#, A, and A#), and land on the fourth half step (B).

    Between B and D, there’s also a minor third made up of one and a half tones. To find this interval, start on B, skip one and a half steps (C and C#), and land on the flat seventh of the major scale (D).

    To play an E minor 7th chord on the piano, you’ll need to locate the keyboard’s E, G, B, and D keys and play them simultaneously with your right hand.

    How To Play Em7 Chord On Piano

    Now that we’ve explained what an Em7 chord is on a piano, it’s time to learn how to play it!

    But before we learn to play the Em7 piano chord, we must first understand piano finger numbers. Piano players use piano finger numbers to identify which fingers to use to press the piano keys.

    On either hand, the thumb represents the number 1, two represents the index finger, three represents the middle finger, four represents the ring finger, and five represents the pinky finger.

    Now let’s learn to play the Em7 piano chord!

    Let’s first look at the root position of the Em7 chord. When a chord is in the root position, it means that the keynote of the chord (in our case, E) is the lowest note of the chord.

    You should use your thumb (first finger), 2nd, 3rd, and 5th fingers to play the notes E (right above middle C), G, B, and D.

    Often, the Em7 piano chord acts as the second degree to an A7 chord.

    In the root position, the notes of the Em7 chord are in the sequence E – G – B – D.

    To play the chord with the right hand in the root position, you will need to place your fingers on the keys as follows: E with finger 1 (thumb), G with finger 2, B with finger 3, and D with finger 5. Using the correct fingerings is essential, as this will help you play the chord smoothly and accurately.

    There are several other voicings or inversions for the Em7 chord that you can explore.

    In the first inversion, the notes of the Em7 piano chord are in the sequence G – B – D – E. In this voicing, the note E is one octave higher than the root position.

    To play the first inversion of the Em7 chord, you’ll need to place your fingers on the keys as follows: G with finger 1 (thumb), B with finger 2, D with finger 3, and E with finger 5.

    In the second inversion, the note sequence is B – D – E – G. To play this voicing; you will need to raise the note G one octave higher and place your fingers on the keys as follows: B with finger 1 (thumb), D with finger 2, E with finger 3, and G with finger 5.

    Now let’s learn how to play a third inversion of the Em7 chord. To do this, you will need to raise the B note by one octave, resulting in the note sequence D – E – G – B.

    To play this voicing, you will need to place your fingers on the keys: D with finger 1 (thumb), E with finger 2, G with finger 3, and B with finger 5.

    Note: You can watch this video to learn how to play the piano E minor seventh (Em7) chord.

    As you can see, the E minor 7 chord has several voicings and inversions you can explore on the piano. By practicing each of these voicings and becoming comfortable with them, you will be able to add more depth and variety to your music.

    FAQs

    Can I Use Em7 Chords In Any Musical Style?

    The em7 (E minor seventh) chord can be used in various musical styles, including jazz, blues, funk, and pop. They can add a sense of tension and resolution to a song and create different moods and emotions.

    Can I Play the Em7 Chord with the Left Hand Instead of the Right Hand?

    Yes, you can play the Em7 chord with either hand, depending on what sounds best in the context of your music. When playing the Em7 chord with the left hand, you will need to use a different finger placement than when playing with the right hand.

    To play the first inversion of the Em7 chord with the left hand, you’ll need to place your fingers on the keys as follows: G with finger 5 (pinky finger), B with finger 3, D with finger 2, and E with finger 1.

    Can I Play the Em7 Chord in Different Octaves?

    Yes, you can play the Em7 chord in different octaves depending on what sounds best in the context of your music. Playing the chord in a different octave can add variety and interest to your music.

    To play the Em7 chord in a higher octave, you will need to find the notes E, G, B, and D on the keyboard higher up from their original positions. You will need to find the notes lower down on the keyboard to play the chord in a lower octave.

    Conclusion

    Learning how to play the Em7 chord on the piano is easy. Following the steps outlined in this article, you can easily learn how to play the Em7 chord in the root position and its various inversions and voicings.

    With practice and dedication, you can master this chord and use it to enhance your musical creations. Practice and dedication will help you become an expert at playing piano chords.

    Whether you are playing a solo piece or accompanying a singer, the Em7 chord adds depth and emotion to your music.

    So, start playing and see what magic you can create with the Em7 chord on the piano!

  • How To Play Bm On Piano

    How To Play Bm On Piano

    Do you want to learn how to play BM on Piano? If so, you’ve come to the right place!

    The Bm chord, also known as B minor, is one of the most played chords in various music styles.

    Playing this piano music chord can take your skills to the next level. It can add depth and emotion to your playing.

    In this blog post, I’ll explain how the Bm chord is built and how to play it on a piano. This lesson covers everything from finger placements to inversions so you can play this chord with confidence and control.

    By the end of this article, you’ll be able to play the Bm piano chord confidently.

    So, let’s get started!

    What is a B Minor Chord (Bm) On Piano

    A B minor chord combines three notes: B, D, and F#. These notes are called the root note (B), a minor third (D), and a perfect fifth (F#). This piano chord is also known as a “B minor triad.” It is written as B minor, Bmin, or Bm.

    Like any other minor triad, you’ll need to combine the root, minor third (flat third), and perfect fifth of the B major scale to create a B minor chord.

    Let’s look at the B major scale!

    The B major scale consists of the notes B, C#, D#, E, F#, G#, A#, and B. In this scale, B is the tonic or root, C# is the major second, D# is the major third, E is the perfect fourth, F# is the perfect fifth, G# is the major sixth, A# is the major seventh, and B is the perfect eighth.

    To form a B minor chord, you must play the third note of the scale (D#) a semitone lower, so you play D instead of D#. D represents the minor third, while D# represents the major third.

    As a result, the notes of a B minor chord are the root (B), the minor third (D), and the perfect fifth (F#).

    B – D – F#

    Note: If you already know how to play the B major chord, you only need to lower the middle note D# by a half step to make a B minor chord. In simple terms, replace D# with D.

    Minor Chord Formula

    Alternatively, you can use the formula of half steps to build a B minor chord.

    The Formula of Half Steps – R + 3HS + 4HS

    Here, the “R” stands for the chord’s root, the 3HS for three half steps, and the 4HS for four half steps.

    In addition to the Bm piano chord, you can form almost all minor chords on your piano keyboard using this formula of half steps.

    Here’s how you can build a B minor chord using half steps:

    First, locate the note B on your piano keyboard to create a B minor chord. You can find the B key right after the group of three black keys.

    After you’ve located B, move three-half steps higher to find D, and from D, move four steps higher to find F#. It will give you the notes B, D, and F#, which make up a B minor chord.

    You will get a Bm chord if you press these three keys simultaneously.

    How To Play Bm On Piano

    Now that you know how a B minor chord form is, it’s time to learn how to play it on a piano. You can play this chord on your piano keyboard in three ways:

    Root Position – Where the B note is the lowest note of the chord.

    First Inversion – In this case, the lowest note of the chord D.

    Second Inversion – In this case, the lowest note of the chord is F#.

    I’ll explain this in some more detail with the images below. But before we get into that, let’s first understand the finger positions for the B minor piano chord!

    B Minor Chord Fingering

    Piano chord fingering is an important aspect of playing the instrument. It involves placing your fingers on the keys in a specific order to produce the desired chord. While there is no correct way to finger a chord, finding what feels comfortable and works best for you is essential.

    If you’re new to piano chords, the fingers on each hand are numbered from 1 to 5 in piano sheet music. Let’s quickly discuss how your fingers are numbered!

    As you can see in the image below, the thumb is finger number 1, the index finger is number 2, the middle finger is number 3, the ring finger is number 4, and the pinky (little) finger is finger number 5.

    The right-hand finger positions are 1 – 3 – 5 in the root position of Bm. In other words, the thumb (finger 1) plays the B note, the middle finger (finger 3) plays D, and the little finger (finger 5) plays F#.

    In the 1st inversion, the finger positions of the Bm chord are 1 – 2 – 5. That means the thumb plays D, the index finger (finger 2) plays F#, and the little finger plays B.

    In the second inversion, the fingering of the Bm piano chord is 5 – 3 – 1. The pinky finger plays D, the middle finger plays B, and the thumb plays F#.

    When we play the Bm chord on the piano, we typically use the first, third, and fifth fingers.

    How To Play The B Minor Piano Chord In Its Root Position

    Playing the Bm Chord in Its Root Position with the Right Hand

    When playing the B minor piano chord in its root position with your right hand, use the following fingers:

    • F# – Fifth finger (5)
    • D – Third finger (3)
    • B – First finger (1)

    See the image below for the correct finger placements to play a B minor chord with the right hand:

    When you press all three notes, your piano will produce a beautiful chord (Bm).

    Remember, your thumb and middle finger (1st and 3rd fingers) should play the white keys, while your pinky finger (5th finger) should play the black key.

    Playing the Bm Chord in Its Root Position with the Left-Hand

    To play the Bm root position chord with your left hand, use the following fingers:

    • F# – First finger (1)
    • D – Third finger (3)
    • B – Fifth finger (5)

    According to the piece of music you’re playing, you might find it easier to play the B minor chord with different fingers.

    In addition to its root position, the B minor chord has two inversions. Now let’s take a look at the inversions of the Bm chord!

    How To Play The 1st Inversion of Bm Piano Chord

    The B minor chord is in its 1st inversion if you put the D as the lowest note in the chord. To play the piano chord with your right hand, you’ll need to use the following fingers:

    • B – Fifth finger (5)
    • F# – Second finger (2)
    • D – First finger (1)

    How To Play The 2nd Inversion of Bm Piano Chord

    When you put the F# as the lowest note in the chord, the B minor is in the 2nd inversion. It is another variation of the Bm chord that can add variety to your playing.

    If you want to play the second inversion of the Bm chord with your right hand, use the following fingers:

    • D – Fifth finger (5)
    • B – Third finger (3)
    • F# – First finger (1)

    To play the second inversion of the Bm chord with your left hand, you should use the following fingers:

    • F# – Fifth finger (5)
    • B – Second finger (2)
    • D – First finger (1)

    Place your fingers on the notes in the proper way and play them all at the same time. Now you can enjoy the sound of this minor piano chord in the second inversion.

    Note: You can also watch this video that shows how to play the B minor chord in its root position and 1st and 2nd chord inversions.

    FAQs

    What Chord Goes Well With Bm?

    Several chords can work well with Bm in a piano piece. Chords commonly used with Bm include Em (E minor), G major, C# diminished, F# minor, A major, and D major chord.

    What Songs Use The Bm Chord On The Piano?

    Many songs use the Bm chord on the piano. Some examples of popular songs that use Bm include:

    • “Hey Jude” by The Beatles
    • “Stand By Me” by Ben E. King
    • “Don’t Stop Believin'” by Journey
    • “Let It Be” by The Beatles
    • “Hallelujah” by Jeff Buckley
    • “Summer of ’69” by Bryan Adams

    This is just a small selection of popular songs that use a Bm piano chord.

    How Do I Incorporate The Bm Chord Into A Song?

    To incorporate the Bm chord into a song, you will need to know the chord progression of the music. A chord progression is an order in which the chords are played in a song. Once you know the chord progression, you can insert the Bm chord wherever it appears.

    Can I Play The Bm Chord With My Left Hand Instead of My Right Hand?

    Yes, you can play the Bm chord with either your right hand or your left hand on the piano. To play it with your left hand, follow the exact finger placement described above, but use your left hand instead of your right hand.

    Conclusion

    Learning how to play the basic triad chords on a piano is one of the fundamental methods to improve your piano skills.

    The B minor (Bm) piano chord consists of the notes B, D, and F#. When you play Bm on the piano, you might find it challenging but rewarding.

    After learning the basics of B minor chord notes, you can experiment with different techniques and styles to find what works best for you.

    Whether you prefer to play with two hands or just one, in root position or first inversion, the important thing is to have fun and let your creativity shine.

    Practice and patience are key to mastering any skill, so don’t be discouraged if it takes some time to get the hang of it.

    So grab your keyboard piano and start exploring the world of a B minor chord!

  • Mastering Piano Chord Inversions: A Comprehensive Guide for Beginners

    Mastering Piano Chord Inversions: A Comprehensive Guide for Beginners

    Just like you, I’m a beginner piano player who’s recently run into something called piano chord inversions. It’s a term that might sound intimidating, but trust me, it’s a concept that’s not only essential but also quite fascinating.

    In our piano lessons, we learn that a chord is a group of notes played simultaneously. The most common ones we encounter are triads, which are 3-note chords. But what happens when we shuffle these notes around? That’s where chord inversions come into play.

    What are piano chord inversions?

    When you’re learning to play piano, understanding and mastering piano chord inversions can truly ramp up the repertoire you can play. Let’s delve a bit further into what these inversions are.

    Piano chord inversions are simply chords played with the notes shuffled in a different order. If you have a basic understanding of chords, you know that they’re groups of notes played simultaneously, often consisting of triads (three-note chords). Switching the order of these notes gives us the so-called inversions.

    Consider this: there’s more than one way to play any given chord. For instance, the inversion exercise for piano in C Major doesn’t look or sound the same as the same chord in B Major. Practicing chord inversions not only makes your playing more versatile but it also enhances your ear’s ability to recognize distinct chordal patterns.

    It might sound intimidating at first but let me assure you, investing time in understanding inversions helps you navigate the keyboard more naturally. You’ll encounter these patterns repeatedly in most piano pieces, so mastering them will prove extremely beneficial.

    Instead of sticking to one chord in its root form, I encourage you to explore altered chord voicings with inversions. You will find that this strategic exercise can help you master essential chord inversions – and quicker than you think. We’re talking weeks instead of years. Sounds exciting, right?

    Let’s proceed to our next section where we’ll learn how to easily identify and create various chord inversions, and what fingering is best to use. There’s a lot to grasp here, but don’t worry, we’ll take it one step at a time. Can hardly wait to move forward in this inversions journey!

    Why are chord inversions important for beginners?

    When first learning to play chords on a piano, most people begin with what’s known as the root position. With a C chord, for example, you’d learn the chord in the sequence of the notes C, E, and G. Sounds simple, right? But here’s the twist: understanding piano chord inversions allows musicians to play these same notes in a different order, providing versatility and a depth of sound that lays the foundation for a broad range of music styles.

    So, why are these inversions so important to beginners, you might ask? Well, by learning to play chords in different but standard positions, beginners can transition smoothly from basic to more complex chords. They become aware of patterns and variations in music that would be tough to isolate without these inversions. This gained versatility opens broader horizons of musical creativity.

    Another crucial thing to master regarding inversions is the ideal fingering technique. The fingering ‘1-2-5’ or ‘1-3-5’ is not arbitrary. The selection depends on the distance of the note adjacent to the pinky.

    Fingering Right Hand Left Hand
    1-2-5 First Inversion Chord Shape Second Inversion Chord Shape
    1-3-5 Any time the note adjacent to the pinky is a third interval Whenever the note next to the pinky is a third interval

    To summarize, if the note next to the pinky is a third interval, the ‘1-3-5’ fingering should be used. ‘1-2-5’ is more suitable when the interval is a fourth ‒ to allow for the larger distance.

    How to identify chord inversions on a piano?

    Learning how to identify chord inversions on the piano can initially feel slow and cumbersome, often involving a painstaking process of figuring out each note as you go. However, rest assured, with practice, these patterns will become ingrained in your musical vocabulary. You’ll be able to see a pattern of notes on a staff, and instantly recognize the chord and its inversion. One recommended practice tool for this skill is using sheet music.

    Reading sheet music can drastically improve your sight-reading abilities, as well as your capacity to quickly recognize chords and their inversions. As you analyze the notes and pay attention to the chord formation’s appearance on paper, the patterns will start to materialize. Between the lines and spaces, you’ll begin spotting the clusters that signal different chord inversions.

    Let’s further understand how you can arrange the notes in a chord, which leads us to the concept of chord inversions. For instance, if you play a triad (three notes), that chord can have three inversions. In the case of a four-note chord, there will be four chord inversions, and so on. Through the table below, let’s visualize this concept:

    Number of Notes in Chord Number of Chord Inversions
    3 3
    4 4
    5 5

    The beauty of piano chord inversions is their ability to help you play the piano in a flowing manner, without making the music sound choppy. They allow for freedom in hand movement, reducing the necessity to stick with the root position for each chord. These inversions contribute to the dynamic versatility of minor or major chords, also known as triad chords. Eventually, with consistent practice and exposure to various chord progressions, this process will come naturally to you. You’ll see a chord inversion without having to think about it.

    Remember, mastering the art of piano chord inversions requires patience and consistency. So, don’t rush. Instead, embrace the learning process and let the music flow naturally. You’ll find the path from a basic beginner to an experienced musician unfolding naturally as your understanding deepens.

    Understanding the different types of chord inversions

    That’s right, even though we’re dealing with the same notes, chord inversions alter the way chords sound, and the difference can be striking. For instance, in the iconic song “God Only Knows” by The Beach Boys, the use of inverted chords lends a unique tension and mood – an effect that regular chords simply couldn’t deliver.

    Let’s dive a bit deeper. Picture a simple C major chord, made up of C, E, and G. In its root position, C sits at the base of our chord. But what if we shuffled things around, put G at the bass? Voila – you’re now looking at a C major chord inversion.

    Remember: A chord inversion occurs when any note other than the root note is placed at the bass.

    If we break it down, there are two fundamental types of inversions relevant to the root, third, and fifth notes in major, minor, and diminished chords.

    Firstly, the Root Position, where the name-giving root note anchors the chord. Secondly, the 1st Inversion, where the third note assumes the role of the bass. And finally, we have the 2nd Inversion, which pushes the fifth to the forefront, sandwiching the other notes in between.

    Here’s a handy trick: next time you’re experimenting with some chords, try out these movements – Root Position, 2nd Inversion, 1st Inversion, and again Root Position.

    These sequences aren’t the only ones possible, but are quite common. It’s all about exploration, after all.

    There aren’t any stringent rules to follow, but a few tips can enhance your play. To put it simply, piano chord inversions allow you to arrange notes in a variety of ways, providing you the freedom to create harmonious music while maintaining a smooth flow.

    If you dive into more complex chords, the number of inversions will rise. For instance, four-note chords offer four inversions. Five-note ones? Five inversions.

    At the heart of mastering this technique is a simple mantra: patience and consistency. Brace yourself for myriad harmonic adventures as you experiment and familiarize yourself with how these variations affect your music.

    Practice exercises for learning piano chord inversions

    Consistent practice is undeniably crucial after understanding the theory behind piano chord inversions. I’d like to share a few methods that can significantly enhance your inversion practice regime. Try dedicating 5-15 minutes of your session to any of these exercises and don’t forget that correct fingering is essential when forming these chords and inversions.

    We’ll start off with a simple exercise that works wonders in developing the muscle memory for the chord you’re practicing. First, select any chord. For example, consider ‘C Major’.

    • Play this chord in root position
    • Move onwards to play the same chord in the first inversion
    • Next, play the chord in second inversion
    • Repeat these steps while moving upwards on the piano for an octave or two
    • Finally, move back down the piano back to your initial position

    This drill could potentially hasten your journey to mastering chord inversions.

    But remember, with a myriad of chord and inversion possibilities, finding an approach to practice can seem daunting. This is when the circle of fifths comes into play. The beauty of this concept is its adherence to most music that move in perfect fourth and perfect fifth intervals. Practicing this way aids in internalizing how music operates.

    Knowing the notes in a chord and their location on the piano is useful but memorizing and intuitively knowing where to find them is a game-changer.
    Before wrapping up this section, let’s not forget an innovative piece of practice – the 21 Inversion Exercise. As the name suggests, this exercise ingeniously cycles through 21 chord inversions drawn from the major scale. This acts as a natural extension of major scale studies for late beginner and early intermediate students. This exercise could potentially revolutionize your inversion practice sessions. Always remember, mastering chord inversions requires patience and tenacity.

    Remember, journeying down the inversions lane not only sharpens your technique but also broadens your stylistic range. Armed with these exercises, you’re ready to delve deeper into the realm of chords and their inversions.

    Conclusion

    Mastering piano chord inversions is a journey, not a sprint. As we’ve seen, they’re crucial for smooth transitions, pattern recognition, and broadening your musical style. Perfecting your fingering technique is key, and the exercises we’ve discussed, such as the 21 Inversion Exercise and the circle of fifths, are practical tools to help you get there. Remember, it’s about developing muscle memory and understanding how music operates. So don’t get discouraged if you’re not getting it right away. Keep practicing, stay patient, and your tenacity will pay off. As you continue to learn and grow, you’ll find that chord inversions add a new depth and versatility to your piano playing.


  • Play 10 Easy Beatles Songs with 4 Chords or LESS!

    Play 10 Easy Beatles Songs with 4 Chords or LESS!

    In this article, the focus will be on the Beatles and their use of four chords or less in their songs. The four chords used in these songs are G major, D major, E minor, and C. While these chords are commonly known as the “four chords chord sequence,” the Beatles did not frequently use this progression. The songs chosen for this list are those that use these four chords throughout the entire song without any other chords.

    The article will cover a variety of Beatles songs that can be played with just four chords or less. Some songs use only two chords, such as “Paperback Writer” and “Eleanor Rigby,” while others use three chords, like “Love Me Do” and “Taxman.” There is also one song, “Let It Be,” that uses the classic four-chord progression. The article will provide chord sheets and tutorials for each song to help readers learn and play along.

    Key Takeaways

    • The Beatles did not frequently use the “four chords chord sequence” in their songs.
    • Several Beatles songs can be played with just four chords or less, including some with only two or three chords.
    • Chord sheets and tutorials are available for each song to help readers learn and play along.

    blue car parked beside white concrete building during daytime

    Four Chords for Every Song

    There are 10 Beatles songs that can be played with just four chords or less, and these four chords are the same for every song. The chords are G major, D major, E minor, and C. However, the speaker clarifies that only one song on the list actually uses these four chords in the same progression. It took a lot of sorting and finding to identify these songs that use the same chords throughout and no other chords in the song at all.

    The first song on the list is “Paperback Writer,” which uses only G major and C major chords and a simple strumming pattern of down, down, up, up, down. The second song is “Eleanor Rigby,” which uses only E minor and C major chords.

    There are a few Beatles songs that use only three chords, and the most famous one is “Love Me Do,” which uses G major, C major, and D major chords. “Taxman” is another simple three-chord song.

    Other songs that use the same four chords as “Paperback Writer” include “Obladi Oblada,” “Come Together,” and “Hey Jude.” The speaker notes that “Let It Be” also uses these four chords, but it deviates from the classic four-chord song progression.

    The speaker provides full song tutorials for more songs on the list on their YouTube channel and website, where they have all the song tutorials in a list with chord sheets and everything. The speaker emphasizes the importance of learning a few chords and trying to get as many songs under your belt with those chords as possible, especially in the early days of learning guitar.

    Two-Chord Beatles Songs

    The Beatles are known for their complex and innovative chord progressions, but there are a few songs that only require two chords. These songs are great for beginners who are just starting to learn guitar or for anyone who wants to play some simple yet classic tunes. The two chords used in these songs are G major and C major.

    One of the most famous two-chord Beatles songs is “Paperback Writer.” The song features a fantastic riff and uses the chords G major and C major. The strumming pattern used in this song is down, down, up, up, down.

    Another popular two-chord Beatles song is “Eleanor Rigby.” The song uses the chords E minor and C major and has a haunting melody that is instantly recognizable.

    There are also a few Beatles songs that use just three chords. One of the most famous three-chord Beatles songs is “Love Me Do,” which uses G major, C major, and D major. “Taxman” is another three-chord Beatles song that uses G major, C major, and D major.

    For those who want to learn more songs with the same four chords, G major, D major, E minor, and C major, “Let It Be” is a classic example. The song starts with the chord progression G, D, Em, C, and then goes back to G and C.

    Other songs that use these four chords include “Ob-La-Di, Ob-La-Da,” “Come Together,” and “Hey Jude.” With just a few chords, you can play some of the greatest songs ever written and impress your friends and family with your guitar skills.

    Three-Chord Beatles Songs

    The Beatles are known for their complex and innovative chord progressions, but there are still a number of their songs that can be played with just three or four chords. In this section, we will explore some of the Beatles’ songs that can be played with just three chords: G major, D major, and E minor.

    One of the most famous two-chord Beatles songs is “Eleanor Rigby,” which just uses the two chords E minor and C major. Another famous two-chord Beatles song is “Paperback Writer,” which just uses the chords G major and C major.

    There are also a few Beatles songs that use just three chords. Perhaps the most famous and well-known is “Love Me Do,” which uses G major, C major, and D major. “Taxman” is another simple three-chord song that uses G major, C major, and D major.

    The Beatles also have a number of songs that can be played with the four-chord sequence of G major, D major, E minor, and C major. One of the most famous of these songs is “Let It Be,” which uses this chord progression throughout most of the song. Other songs that use this chord progression include “Obla Di Obla Da,” “Come Together,” and “Hey Jude.”

    It’s important to note that while the four-chord sequence is often referred to as the “four chords” progression, the Beatles did not use this progression often. It took a lot of sorting and finding to find these songs that use these same chords throughout and no other chords in the song at all.

    Overall, these three and four-chord Beatles songs are great for beginners who are just learning guitar and want to play some classic songs. With just a few chords, you can play some of the most iconic songs in rock history.

    Three-Chord Beatles Songs with a Different Chord

    There are ten Beatles songs that can be played using four chords or less, specifically G major, D major, E minor, and C. While these chords are often referred to as the “four chords chord sequence,” there is only one song on the list that uses these chords exclusively. The rest of the songs on the list utilize these chords throughout the song, with no other chords included.

    The first song on the list is “Paperback Writer,” which uses only G major and C major chords. The speaker demonstrates the strumming pattern of “down down up up down” used in the song. The next song on the list is “Eleanor Rigby,” which uses only E minor and C major chords.

    Several Beatles songs that use only three chords, including “Love Me Do,” which uses G major, C major, and D major chords. “Taxman” is another three-chord song, which uses the same chords as “Love Me Do,” but with a different rhythm. The speaker notes that a full tutorial for “Taxman” will be available soon.

    Two bonus songs that use the chords D major, G major, and A major, including “Twist and Shout” and “Get Back.” The speaker notes that these songs are simple three-chord songs that can be played with just a few minutes of practice.

    Four songs that use the same four chords as “Let It Be,” including “Ob-La-Di, Ob-La-Da,” “Come Together,” and “Hey Jude.” The speaker notes that playing these songs with the same chords as “Let It Be” requires a capo on the second fret.

    So you see the importance of learning a few chords and using them to play as many songs as possible.

    brown wooden puzzle blocks on white surface

    The Classic Four-Chord Song

    The Beatles are known for their catchy melodies and memorable lyrics. However, what many people don’t know is that they often used the same four chords in many of their songs. These chords are G major, D major, E minor, and C major. Although this chord progression is commonly referred to as the “four chords chord sequence,” there is only one song on this list that uses these chords exclusively.

    The first song on the list is “Paperback Writer.” This song uses only two chords, G major and C major, and a simple strumming pattern. The song’s catchy riff is a highlight, but the rest of the song relies solely on these two chords.

    Another famous two-chord Beatles song is “Eleanor Rigby,” which uses the chords E minor and C major. The song’s haunting melody and lyrics make it a fan favorite.

    There are a few Beatles songs that use just three chords, such as “Love Me Do,” which uses G major, C major, and D major. “Taxman” is another simple song that uses just three chords, but the original recording has more complexity.

    “Rock and Roll Music” is a 12-bar blues song that can be played with the three chords G, C, and D. “Can’t Buy Me Love” is another song that uses the same 12-bar blues chord progression.

    Two other bonus songs that use the chords D, G, and A major are “Twist and Shout” and “Get Back.” These songs are simple three-chord songs that anyone can play with just a few minutes of practice.

    The classic four-chord song that uses the chords G major, D major, E minor, and C major is “Let It Be.” This song is in the key of C major, so to play it with these chords, a capo is needed on the fifth fret.

    Other songs that use these same four chords include “Ob-La-Di, Ob-La-Da,” “Come Together,” and “Hey Jude.” These songs demonstrate the capabilities of what can be done with just a few chords and a little creativity.

    In conclusion, the Beatles were masters at creating memorable songs with simple chord progressions. By using the same four chords in many of their songs, they were able to create a unique sound that is still beloved by fans today.

    The song book below is one of my favorites. It’s an exhaustive collection of Beatles’ songs. Click the picture to purchase it on Amazon.

    The Beatles Sheet Music Collection - Piano, Vocal and Guitar Chords

  • How to Learn to Play Chords on a Digital Piano

    How to Learn to Play Chords on a Digital Piano

    Are you ready to learn how to play chords on your digital piano?

    In this article, we’ll guide you through the process of getting started with chords, understanding essential chord theory, and mastering basic chord shapes.

    We’ll also share techniques to help you improve your chord transitions and explore advanced chord progressions.

    By the end, you’ll have the skills and knowledge needed to confidently play a variety of chords on your digital piano.

    Let’s dive in and get started!

    Getting Started With Chords on a Digital Piano

    If you’re new to playing chords on a digital piano, the first step is to familiarize yourself with the different types of chords and their fingerings. Chords are the foundation of music and learning them will greatly enhance your playing abilities.

    Start by understanding the basic major and minor chords. Major chords have a happy and uplifting sound, while minor chords create a more somber and melancholic tone. Once you have mastered these, you can move on to more advanced chords like suspended, augmented, and diminished chords.

    Each chord has its own unique finger placement on the keyboard, so it’s important to practice and memorize the correct positions. Take your time to learn and practice each chord until you can effortlessly play them on your digital piano.

    Essential Chord Theory for Digital Piano Players

    Understanding the basic theory behind essential chords is crucial for digital piano players. By grasping the foundations of chord theory, you’ll be able to construct and play a variety of chords confidently on your digital piano.

    Chords are made up of three or more notes played simultaneously, and they provide the harmonic structure and foundation for many songs. The most common chords you’ll encounter are major, minor, and dominant chords.

    Major chords have a happy and uplifting sound, while minor chords create a more melancholic and somber feel. Dominant chords add tension and a sense of resolution to a piece of music.

    Learning how to build and play these essential chords will greatly enhance your ability to play a wide range of songs on your digital piano.

     Mastering Basic Chord Shapes on a Digital Piano

    Mastering the basic shapes of chords on a digital piano can greatly improve your playing ability. By familiarizing yourself with these fundamental chord shapes, you will be able to play a wide range of songs and progressions more easily.

    Start by learning the major and minor chords in all keys. Practice moving between these chords smoothly and accurately, paying attention to correct hand and finger positioning.

    As you become more comfortable with these basic shapes, you can then move on to more complex chords such as sevenths, suspended chords, and inversions. Remember to practice regularly and gradually increase the difficulty of the chord progressions you play.

    With time and dedication, you will develop a strong foundation in chord shapes, enhancing your overall piano playing skills.

    Techniques to Improve Chord Transitions on a Digital Piano

    To improve your chord transitions on a digital piano, focus on practicing smooth and accurate hand movements between different shapes.

    Start by placing your fingers on the correct keys for each chord shape. As you play the first chord, pay attention to the position and movement of your fingers. Keep your hand relaxed and avoid unnecessary tension.

    When it’s time to transition to the next chord, lift your fingers off the keys and move them swiftly to the new positions. Aim for a seamless transition, without any pauses or hesitations.

    Practice this movement repeatedly, gradually increasing the speed and accuracy of your transitions. Remember to start slow and gradually build up your speed. With consistent practice, your chord transitions will become more fluid and effortless.

     Advanced Chord Progressions for Digital Piano Players

    As you progress on the digital piano, you’ll come across more complex chord progressions that challenge your skills and creativity. These advanced chord progressions add depth and complexity to your playing, allowing you to create beautiful and intricate music.

    One example of an advanced chord progression is the ii-V-I progression, commonly used in jazz music. This progression involves playing the second, fifth, and first chords of a major scale in sequence.

    Another challenging chord progression is the circle of fifths, which involves moving through a series of chords that are a fifth apart. These advanced chord progressions require precision and dexterity in your fingers, as well as an understanding of music theory.

    Take your time to practice and master these progressions, and soon you’ll be able to impress others with your skillful playing.

    What Is the Best Digital Piano for Beginners to Learn Chords On?

    The best digital piano for beginners to learn chords on is one with weighted keys and a variety of sound options. It should also have a user-friendly interface and built-in tutorials to help you learn chord progressions.

     How Long Does It Typically Take to Become Proficient at Playing Chords on a Digital Piano?

    It typically takes time and practice to become proficient at playing chords on a digital piano. You need to consistently work on your technique and build muscle memory.

    It’s important to dedicate regular practice sessions to chords, focusing on the correct finger placement and hand positioning. This will help you develop the necessary strength and coordination to play chords smoothly and accurately.

    In addition to practicing chords individually, it’s also beneficial to practice transitioning between different chords. This will improve your ability to quickly switch between chords in a song or piece of music.

    Remember to start with simple chords and gradually progress to more complex ones as you become more comfortable. Don’t get discouraged if you make mistakes or find certain chords challenging at first. With patience and persistence, you’ll gradually improve and become more proficient at playing chords on a digital piano.

     Are There Any Shortcuts or Tricks to Help With Learning and Memorizing Chord Shapes on a Digital Piano?

    There are no shortcuts or tricks to help with learning and memorizing chord shapes on a digital piano. It takes practice and dedication to become proficient.

    Keep practicing and you’ll get there!

    Can I Use the Same Chord Shapes and Progressions on a Digital Piano as I Would on an Acoustic Piano?

    Yes, you can use the same chord shapes and progressions on a digital piano as you would on an acoustic piano.

    The layout and functionality may be slightly different, but the principles remain the same.

    Are There Any Specific Exercises or Drills That Can Help Me Improve My Chord Transitions on a Digital Piano?

    To improve your chord transitions on a digital piano, try exercises like playing simple chord progressions in different keys. Gradually increase the tempo as you practice regularly to build muscle memory and improve your coordination.

    Conclusion

    So there you have it! You’ve learned the basics of playing chords on a digital piano. By understanding chord theory, mastering basic shapes, and practicing techniques for smooth transitions, you’ll be well on your way to becoming a skilled digital piano player.

    Don’t forget to challenge yourself with advanced chord progressions to further enhance your skills. Keep practicing and exploring different chord combinations, and soon enough, you’ll be playing beautiful music on your digital piano!

  • How To Play E flat On Piano

    How To Play E flat On Piano

    Piano chords are an essential part of playing piano effectively. If you’re a beginner piano player, you may wonder, “how to play an E flat chord on a piano?”

    E flat is a commonly used chord in music, and it’s relatively easy to learn how to play.

    Like all triads, this piano chord consists of three notes. With just a few simple steps, you can master this chord and use it to create beautiful piano music.

    You can play E flat in any octave on your piano with either hand.

    In this article, I will show you a step-by-step guide on how to play an E flat chord on the piano. Also, I will include keyboard diagrams in this guide to better aid you with learning the piano chord.

    So, let’s get started!

    What Is An E Flat Chord On A Piano?

    E flat is a musical pitch half step lower than E. It is also known as Eb, where the latter “b” stands for flat in music theory.

    On a piano, the key for E flat (Eb) is located to the left of the key for E. When you play the E flat key on a piano, you will hear a one-half step lower pitch note than the E key.

    The E flat key is also the black key located between the D and E white keys on the keyboard.

    How to make an Eb chord on a piano?

    E flat major chord consists of three notes. This chord consists of a root (E♭), a major third (G), and a perfect fifth (B♭) of the major scale on piano.

    Eb – G – Bb

    That means you play notes 1, 3, and 5 on the scale. When you play these notes simultaneously, the result is an E-flat major chord.

    Alternatively, you can use the formula of half steps to build the E flat major chord.

    The Formula of Half Steps – R + 4HS + 3HS

    Here, the R stands for root, the 4HS for four half steps, and the 3HS for three half steps. You can form almost all major chords on a piano keyboard using this formula of half steps.

    Here’s how you can build an Eb major chord on the piano using half steps:

    First, locate the root note (E flat) on your piano keyboard. On your keyboard, there are two black keys. The second black key is E flat. Now move four half steps to the right to find the major third (G). And then three more half steps to the right to find the perfect fifth (B flat).

    In simple terms, once you have found Eb, play the 4th key (G) and the 3rd key after G (Bb) on your piano keyboard. Press all three keys simultaneously to play the E flat major chord.

    Eb Chord Piano Finger Position

    Before we get to our main topic, “how to play an E flat on the piano,” it’s essential to know what fingers play what keys.

    In piano sheet music, the fingers are numbered. They tell players which finger to use to play a specific note.

    Let’s quickly discuss how your fingers are numbered!

    We have five fingers in one hand. And each finger has a number from one to five.

    The thumb represents finger 1, the index finger represents finger 2, the middle finger represents finger 3, the ring finger represents finger 4, and the pinky (little) finger represents finger 5.

    The numbers are the same on both hands.

    When we play the Eb piano chord on the piano, we typically use the first, third, and fifth fingers.

    How to Play an E flat (Eb) On The Piano

    Now you know what Eb is and how it is made up. In this section, I’ll explain how to play an E-flat piano chord with the right hand, the left hand, and both hands.

    Playing the E-flat (E♭) Chord with the Right Hand

    You will use the following fingers to play the root position chord with your right hand:

    • B♭ – Fifth finger (5)
    • G – Third finger (3)
    • E♭ – First finger (1)

    To play the E-flat major chord with the right hand, place your pinky finger on B-flat, the middle finger on G, and the thumb on E-flat. In this position, the Eb chord is at its root.

    See the image below for the correct finger placements to play an E-flat major chord in its root position with the right hand:

    You’ll hear the Eb piano chord sound as you press all three keys together.

    Remember that you play black keys with your pinky and thumb while you play white keys with your middle finger.

    Try to line up your fingers on your piano keyboard and let them relax so you can get a feel for the hand position.

    The key difference between a chord and a note (or melody) is that a chord involves multiple keys played simultaneously, while a melody involves multiple notes played in succession.

    So, press down on Eb, G, and Bb simultaneously to create the Eb piano chord. Beginners often press down with all four fingers (two and four included), which can create an unpleasant sound.

    To avoid this, lift fingers two and four as high as you can while still feeling comfortable, and press down on all three keys at once. It will take some practice to find the right amount of pressure.

    Playing the E-flat (E♭) Chord with the Left Hand

    We’ve played the Eb major piano chord with the right hand. Now let’s play this chord with the left hand.

    You will use the following fingers to play the root position chord with your left hand:

    • B♭ – First finger (1)
    • G – Third finger (3)
    • E♭ – Fifth finger (5)

    To play the Eb major chord with the left hand, place your first finger (thumb) on B-flat, third finger (middle finger) on G, and fifth finger (pinky finger) on E-flat.

    Remember that your third finger will play a white key, while one and five fingers will play black keys.

    The image below shows the correct fingering for playing an E-flat major chord with the left hand:

    Spend a few minutes to line your fingers up and practice the same as you did with your right hand, ensuring that fingers 2 and 4 are comfortably out of the way. Once you’re comfortable, try it with both hands together.

    Playing the E-flat (E♭) Chord with Both Hands

    Now let’s learn how to play the Eb chord with both hands!

    First, pick an Eb, G, and Bb in the right hand with the exact finger placement as previously described. Now, place the left hand in the same position as the right.

    Once both hands are in position, line up all the needed fingers and press down on all the keys at the same time to play the chord.

    For a visual example, here is a diagram:

    Ensure that your 2 and 4 fingers on both hands are out of the way, and then try it out.

    What are the inversions of E♭ major?

    In addition to its root chord position, E♭ major chord has two inversions. Here we’ll learn how to play the Eb major chord’s 1st inversion and 2nd inversion.

    How to play the 1st inversion of E♭ major

    The 1st inversion of the Eb chord means that the G is played as the lowest note, followed by E♭ and B♭.

    To play the 1st inversion of an E♭ major chord on piano with your right hand, use the following fingers:

    • E♭ – Fifth finger (5)
    • B♭ – Second finger (2)
    • G – First finger (1)

    Once you’ve positioned your fingers correctly, press down all the notes simultaneously to create the chord.

    How to play the 2nd inversion of E♭ major

    The 2nd inversion of the Eb chord means that the note B-flat (Eb) is played as the lowest, followed by G and E♭.

    Use the following fingers on your right hand to play the 2nd inversion of E flat major:

    • G – Fifth finger (5)
    • E♭ – Third finger (3)
    • B♭ – First finger (1)

    Practice playing this piano chord a few times until you are comfortable with the fingering and the sound of the chord.

    Conclusion

    As you can see above, I’ve explained how to play E-flat (Eb) on the piano. Now you know what notes make up the E-flat major chord and how to play E-flat major scale well.

    Playing an E flat on the piano is a simple but essential skill for any pianist. If you follow the steps outlined in this blog post, you should be able to play an E flat on the piano with your right hand, left hand, and both hands together.

    Practice is key, so keep practicing until you feel comfortable and confident playing this note. If you devote some time and effort, you’ll soon be able to play an Eb major scale like a pro.

    So, grab your piano keyboard and start practicing the E-b major chord!

    Related Topics